
Improving FLL Robot Game. Task. Lift your robot with 40 teeth gear wheels.
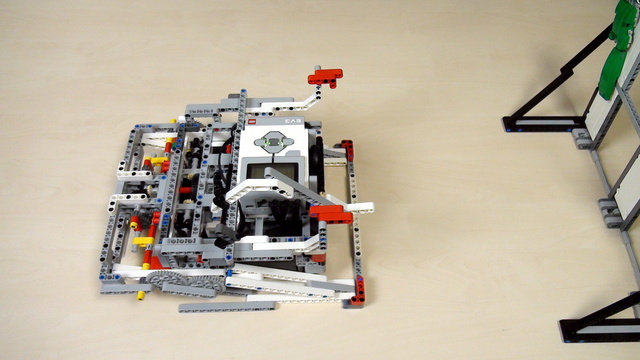
Build a similar mechanism to this one. Similar, but for your robot. This is the task for you. Try, give yourself half and hour or even an hour.
- #445
- 06 Mar 2017
Build a similar mechanism to this one. Similar, but for your robot. This is the task for you. Try, give yourself half and hour or even an hour.

What is the end result? - have the attached on the mission model. What is the mechanism the would make the robot hang on the mission model.

Build a robot base to use in the course. You can use the robot base provided by us or you can build one yourself.
The FIRST LEGO League competition is similar each year. With a little experience you could accomplish most of mission. The goal of this episode is to introduce you to the course, its purpose and approach.

Let's move with the VEX EDR robot using its motors, the wheels and some RobotC programming. We devide the program in three parts - Connect the motors, program the controller and turning.

The challenge is to make the robot move back and forth with ever decreasing distance.

Program the robot to move forward by 50cm (20 inches).

Unplug one of the cables and observe what the robot does.

It seems obvious and intuitive how to connect the robot and the computer. We must cover that part, so that we are sure you can download our programs to the robot later on.

We will demonstrate how to connect the brick and the motors by using cables correctly and reliably.

Overview of what is going to happen that part of the lessons.

Do it yourself, fix the errors in the construction of the EasyBot

Overview of what is going to happen in module 3

In this course, you will work with other students in the group. These might be your classmates, teammates, or students you know from other activities. It is important to know your group so that you can work together with them in the best possible way.

Turning with the Gyro Sensor on a specified angle and stopping there have never been easy. It is not going to get any better. However, this is not a problem of the Gyro sensor. The problem is in the way we develop our programs.

The Gyro sensor in LEGO Mindstorms EV3 sets is new for the sets and we answer basic questions about its usage. The sensor detect when the whole constructions turns at a particular angle, but there are a number of gotchas in using it.

The EV3 Gyro sensor is quite powerful, but there are some little tricks when using it. In the previous episode we showed a hardware solution to the problem and now we are exploring how could the sensor be calibrated from the EV3-G software. Thanks to Sharon and Faye (full names omitted) for the request for this video.

The robot uses one middle motor. This middle motor with the use of a few gear systems controls for different axsels. We have attached wheels on this axles so it is very easy to extend the robot construction for additional LEGO Mindstorms active attachments

The course is very suitable for students and you don't have to buy a new set for each student. You can group them, divide them, organize the use of the sets and you could technically work with 70-80 student with only 6 sets.

Time to experiment with the controller, the diode and the program that makes the diode blink. Don't be afraid to change the program. We've prepared a number of tasks for you in the course that you should definitely complete before moving forward.

Arduino programs are developed with a software and this software is downloaded from the http://arduino.cc site.

Developing a program for the Arduino is very easy. We need to do again three thigs:

It is a hardware/software related course. You need a set with parts. And you need a number of sets for a class of students. You can buy the set from us, from other vendors, from online retailers. It doesn`t matter actually as long as you have the needed parts for the course. We have tried to create a very lean set, but if you can afford to buy additional parts you could create more complex and probably more interesting devices.

The course is designed for classes of students, but it could also be used personally. Each module should take you about 20 minutes and depending on how long your student hours are and how much time you will leave the students to experiment and solve tasks you could include different numbers of modules in your class.

This is a course for beginners, but the tasks would be interesting and for more intermediate students. We do not expect any previous knowledge from you except for how to divide numbers and use a computer.

Answering three questions:
Why - because we believe any student and basically anybody must have a basic understanding of how electronic works. This course gives us the chance to present it and to move forward to better and smarter robots.
How - we do videos, we set tasks. You solve them.
What - we are using Arduino. Because it is popular, it is easy and we like it.

Here we start with a second box robot that we would like to build. It is in a way improvement to the first robot and we would take a look at its features.