

Зъбни колела. (Част 2)
В първа част от уроците за зъбни колела ви показахме основите на системите от зъбни колела. Сега ще разгледаме системи от зъбни колела с повече от две колела и каскадни зъбни предавки.
- #65
- 21 Dec 2014
В първа част от уроците за зъбни колела ви показахме основите на системите от зъбни колела. Сега ще разгледаме системи от зъбни колела с повече от две колела и каскадни зъбни предавки.

Зъбните колела могат да бъдат силен инструмент в ръцета на този, който знае как да ги използва. В този материал ще се запознаем с основни определения и понятия , свързани със зъбните колела.

The topic of this tutorial is the purpose of a system of gears when throwing a ball.

In this episode we continue from Episode 55 and we improve the durability and stability of the attachment for a LEGO Mindstorms EV3 robot. Many times attachments are not very stable which results in gaps between parts. The goal of the video is to give basic construction ideas.

In this video lesson I am building a LEGO Mindstorms EV3 active attachment powered by a small gear wheel. The attachment could move up and down, it is very useful for collecting objects. It could easily be adapted and used on other robots.
We are making a parallel with Video Lesson 56 from the series and we are also showing ways to improve the stability of an axle which is most of the time neglected, but could lead to great problems.

We are describing the Warm gear in this video. This worm gear does most of the magic of controlling how the different gear wheels move on the different axles.

How to align the wheels and how much should you push for this solution?

In this episode we build a reusable attachment for a LEGO Mindstorms EV3 robot that changes gears orientation and direction. It is one of the most useful attachments that you could use to move levers up/down and right/left. Adding the attachment on the robot takes 2-3 seconds and shows a very useful general principle of how to build reusable attachments.

Part three of the Catapult series is about loading the catapult automatically. We use a gear system with a medium complexity along with a very interesting "clutch" developed with parts entirely from the LEGO Mindstorms NXT kits. As a result, at the end of the video, the Catapult automatically loads and fires.

We calculate the number of rotatios when a gear system is involved. The driving wheel will have to do a number of rotations for the driven wheel to rotate to a desired number of degrees. In our specific case when the driven gear wheel is rotate to about 90 degrees the legs will lift the robot.

Part four of the Catapult series is again about loading the catapult automatically but this time using EV3 brick, motor and sensor. We use a gear system with a medium complexity along with a "standard clutch" available in the LEGO Mindstorms EV3 kits. As a result, at the end of the video, the Catapult loads and fires automatically.

In this tutorial, we would drive the scissors mechanism and there are a number of rules that we must follow

We continue from part 3 where we finished part of the 'rear'. Power is transfered from a motor to the wheels but having about 16 gear wheels makes it more than complex for this LEGO Mindstorms EV3 Competition robot.

It this episode we would present you with our attachment for lifting the robot.
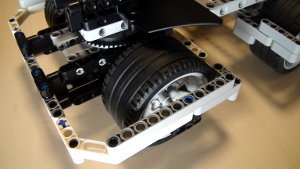
We continue from part 4 where we made a controlled experiment to transfer power from a Mindstorms motor to the rear wheels. The construction was too complex and inefficient and in this video lesson we are improving it by lowering the differential and removing all gear wheels from this LEGO Mindstorms EV3 Competition robot.