There are a few things that you should be careful about when building from instructions .
- #342
- 18 Jan 2017
- 4:20
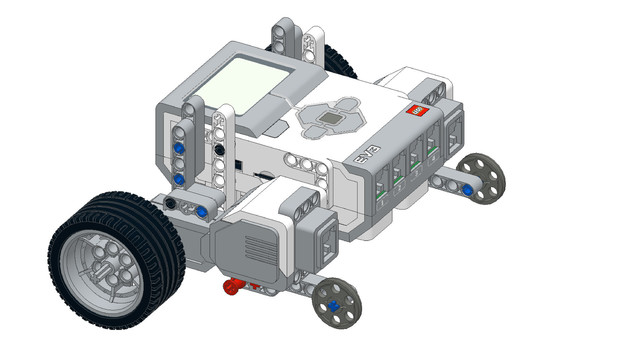
Position of the brick
Pay attention to the position of the brick. The display should be looking toward you.
The display is important when choosing and starting programs, and the side of the ports is important for choosing the optimal cable length and route.
Pay attention to parts orientation
L-shaped beams could be mistakenly put in a mirrored position.
Pins could also be put on the left or on the right side of a beam, and that makes a difference.
Pay attention to the size of parts and their positioning
Pay attention to the length of parts - 7 axle vs 5 axle.
Also, pay attention to the position of the pieces - which side of a pin goes to which hole on a beam.
In a nutshell
Always make sure that what you have built in each step looks exactly like the picture you see in the instructions.
English
When you build the robot or basically every robot that we show you you follow a number of instructions. You follow a PDF document or other documents and you follow instructions. While following these instructions there are a couple of things that you should be careful about and in this video I'll stop at some of them.
First, every robot has this brick. And when you are using the brick it kind of looks symmetrical but you should be careful how you place the brick because in this way you would arrive at a different solution. And it's different if you have this robot looks like this with the display of the brick pointing forward and it will be a different robot if the display is placed like this. So you should always be careful of the direction of the brick. Next, in the set and in most of the robots you generally use beams that have angles. And you must be careful of the direction in which you put these beams. So you should follow strictly the instructions. And it's very different if you place the beam like this or if you place the beam like this.
In this way you will arrive at completely different robots and I'm mentioning this because we've seen a lot of students trying to follow the instructions and sometimes they just place the beam in the reverse way. So, be careful how you place your beams and follow the instructions correctly. It seems very very easy but it's not. When you have the beam and it's some kind of an angle beam you can see that it has a number of holes and in the PDF instructions you see this small pin and an instruction to put this small pin in one of the holes. And a common mistake is to just put the pin in another hole. And from this your construction will be wrong. You won't be able to follow the instructions correctly. So it's very important when you place your pin to place the pin in the correct hole. The second, the third, the fourth. You must count this from the PDF document. Also when you then place the beam with the part on the robot you must be very careful how you place it on the brick. Like this, on this side of the brick like this, on this side of the brick or like this or like this. There are so many different configurations that you can think of. You must follow the instructions correctly. In the robot most of the time you'll have these axles. And there are grey and black axles in the EV3 set. And there is a difference between these axles. When following the PDF instructions for building the robot next to the axle that is shown you'll see a small number. And this number is the length of the axle. An this number is like 4, 5, 6, 7, 8. And it's interesting to mention what this length is. And if you take a beam like this and you can see that is has a number of holes. So actually the length of the axle is measured in the length of the holes that it takes on the beam. And this axle is with length 7. 1, 2, 3, 4, 5, 6, 7. And this axle is with a length of 5 holes. Like this. So, be careful to use the axles with the correct length.
Courses and lessons with this Tutorial
This Tutorial is used in the following courses and lessons
EV3 Phi. Introduction to robotics with LEGO Mindstorms
The things that you will be able to do with your EV3 robot by the end of this course are:
Freely move your robot towards desired target;
Avoid obstacles on the path of your robot using sensors;
Follow lines of any shape;
Detecting and picking up objects of any kind;
- 92
- 220:20
- 36


Robotics with LEGO - Level 1.0 - Adventure in Space
The first level of the Robotics with LEGO curriculum for students in fifth to twelfth grades.
Various constructions with robots are built. Learn how to control the motors so that the robot navigates around the Moon and Earth in various ways. Getting to know the first two sensors. The robot can feel its surroundings with the help of the Touch sensor and avoid obstacles.
The Ultrasonic distance sensor can help the robot avoid obstacles. Students work with concepts like loop, degrees and medium motor. Robots can now do two different actions at the same time - while solving missions on a field, the third motor clears detected obstacles.
- 126
- 123:52
- 150

Lesson 1 - Moving like a Yo-Yo
Introduction
Today, you will get to know your classmates and your teacher, learn how the lessons are conducted, construct your first robot, and learn how to program it to move. The end goal of this lesson is to make the robot move like a Yo-Yo. How does a Yo-Yo move?

If you have ever owned a Yo-Yo, you know that it's meant to fall down and rise back up to your hand. But in order for it to move successfully, we need to move our arm in such a way that we provide it with the required velocity. Otherwise, it will decrease the distance on the way back up on each drop until it stops.
Try to make a good impression on the rest of your class, because you will be doing this course with them until the end.
- 19
- 4
- 9
- 3d_rotation 1
Level A1. Introduction. Robotics with LEGO
Introduction to robotics - The first level of the Robotics with LEGO curriculum for students in second, third or fourth grades. A journey in space, with robots. Various constructions with robots are built. Learn how to control the motors so that the robot navigates around the Sun, the Moon and Earth in various ways. Getting to know the first of the sensors. The robot can feel its surroundings with the help of the Touch sensor and avoid obstacles.
- 142
- 133:42
- 187
Lesson 1 - Moving forward
Your LEGO sets and the workplaces must be in exemplary shape. Beyond that, you must do one more thing.
- 12
- 5
- 8
- 3d_rotation 1
Python with LEGO Mindstorms EV3 - Level 1
The course introduces students to the programming language Python. We use LEGO Mindstorms EV3 Robots. Python is a popular programming language. It could be used for introducing students to programming, for academic studies, for developing machine learning algorithms and as a general-purpose language.
During the course, students learn how to read and how to develop Python programs. They use an Integrated Development Environment called Visual Studio Code. Robots are programmed to perform interesting and funny tasks like "bringing you water". The level ends with competition on a playing field with boxes.
- 74
- 28:18
- 114
Lesson 1 - Beverage Assistant
Introduction
Anyone who decides to develop themselves in the field of robotics does so because they have been dazzled by the possibilities of automation in everyday life.
Whether you wish to build a multitude of small robots that work together to make your life easier or a big humanoid robot that does your homework for you, you have also come here to create your own robots.
In order to create complex robots, we first need to build simpler ones but this does not mean that they cannot be functional. "Paalia Technology" is one of the companies that began manufacturing and selling robots that are programmed to be waiters and today we will make a simple robot that serves tables today.
For most of us, these are the first steps into robotics, which is why we will start with a simple platter robot that moves to a specific location and returns.
In every lesson, we will learn how to make increasingly more complex robots and you will be able to automate more aspects of your life.

- 14
- 4
- 6
- 3d_rotation 1

Level A1 - Space Adventure - Robotics with LEGO SPIKE Prime
This is the first level of the LEGO Robotics Curriculum for second, third, and fourth-grade students.
A "space adventure" but with robots. Different robot structures are built in Level A1. The motors are controlled so that the robots perform precise movements around the "Earth", "Moon" and "Sun". We use the force sensor to overcome various obstacles we bump into. We learn interesting facts about the solar system and space vehicles.
- 65
- 30:30
- 76

![Image for [In Development] The fun level - Game-oriented introduction to LEGO robotics](https://d2nmr6p48f8xwg.cloudfront.net/content_pictures/pictures/000/002/636/a4f229bae5979562f6bfe32adc6281e577e312674a0cc5c98f8fdfe15e7c7da9b89f826a037575a5LEGO-Mindstorms-Ev3-Yolanda-Sailship-Robot-Fllcasts.png)
[In Development] The fun level - Game-oriented introduction to LEGO robotics
A level, designed for introduction in LEGO-robotics, focused mostly on games. We use goal-oriented challenges to make the students want to accomplish a certain task, learning a lot in the process. Some of the games we have included here are football, bowling, paper-plane competition and many more. It is suitable for studens 8 to 12 years old, but even older students will have a lot of fun with the activities.
This is a brand new course that we are experimenting with in a groups in June 2019. Keep in mind that it is possible to use it for summer camps and groups, but there are a few lessons that will be improved on the fly.
- 38
- 42:14
- 40

Lesson 1 - Introduction
Introduction
Today the robot we are building is a spaceship once again. The aim for today, however, is exact - to reach the further (dark) side of the moon!
Where is located the dark side? Why is it so hard to be reached? Why is it called "dark"?
- 23
- 3
- 15
- 3d_rotation 1