In this video tutorial we experiment with different ways of solving the sports mission for throwing the ball. We show seven different LEGO MIndstorms EV3 and NXT robot constructions and attachements. Most of the techniques could be applied for any mission involving throwing a ball or an object.
- #86
- 12 Apr 2015
- 5:15
- LEGO MINDSTORMS, LEGO MINDSTORMS EV3
- Shoot, FIRST LEGO League, FIRST LEGO League 2014-2015 World Class, Attachments, EV3, FLL 2014, FLL, Construction
The first step toward solving a mission is to get familiar with the rules related to it. That is why I begin with repeating the required condition and the required method for throwing a ball. The two documents, you must know by heart are the the Challenge and the Challenge Updates.
After you have read the rules, you can proceed with thinking for different ways for solving the mission. In general we overview the following techniques, shown by different EV3 LEGO Mindstorms robots:
- throw over the ball with attachment powered by the motor - here we take a look at three different attachments. We test what will be the difference when using a small arm and a larger arm. Also show a possible attachment where we use the ricochet from the motor for the shot;
- throw over the ball with attachment powered by rubber bands - this is the most common attachment, built by students. Rubber bands are attached to the arm and are stretched. When the arm is released the rubber bands pull the arm upwards and the ball is thrown;
- shoot the ball by deforming LEGO pieces - this is one of the most interesting techniques. Using a motor or as shown a linear actuator, the LEGO pieces are deformed. Due to the laws of physics, the pieces try to get to their normal position. When the tipping point is reached they do so rapidly, which results in shooting the ball.
All of the methods are illustrated with examples from teams competing in the FIRST LEGO League 2014 World Class Challenge.
Your turn
What do you think about the shown techniques? Which one do you find most effective?
Let us know in the comments below!
Building instructions for the base of the attachments
- note that you could attach it to the brick both sides, depending on which technique you would like to test. Use the video as a reference.

![]()
Building instructions for the short arm
- you should attach it to the motor, depending on the orientation of the motor

![]()
Building instructions for the long arm
- you should attach it to the motor, depending on the orientation of the motor.

![]()
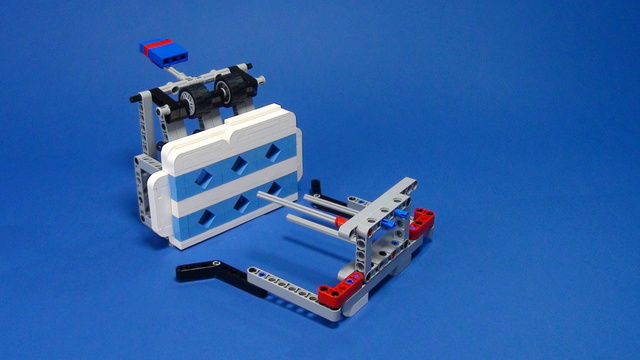
Building instructions for the attachment with the LEGO Technic Linear Actuator
This LEGO attachment connects a LEGO Mindstorms EV3 Motor with a LEGO Technic Linear Actuator. The connection is through a couple of gears which makes the whole instructions quite interesting and useful as an example.
The attachment was used during FIRST LEGO League 2014 Robotics competition.

![]()
English
- In the first video about the 2014 FIRST Lego League Challenge, I would like to stop on the sports mission. I believe that this was the most exciting mission and also there are a lot of ways to tackle it.
First of all, let's remember what was required. There is a required condition visible at the end of the match necessary for scoring the mission. So in the end of the match the ball should be touching the mat inside the net. There is also a required method for throwing the ball. All the equipment involved with the shot was completely east or north of the shot lines while sending the ball to the net. If you open the Challenge Updates, you could also see in Update 31 a clarification about the required method. Now let's think how we can complete the mission. In general, there are several ways to do so. The first one is to throw over the ball. We will try with the simplest way. I'll be using a motor attached to the base construction. Note that in general it is not a good idea to build such attachments because the robot would not be balanced, which is important if you want your robot to be accurate during turns but for the purpose of the video, I'll use just a motor attached to the brick. I have attached this two LEGO technique angled beams to the motor so let us see what will be the result. As you could see, the ball is barely thrown. That is due to the fact that the lever is short. You need to have a larger distance between the point of rotation and the place where the ball is. The larger the distance is the greater the speed of the ball will be and the larger it will be the distance the ball will travel. So let us build a larger arm. Now the lever is longer. However, the ball would not go far away because the back of the arm pushes the ball toward the ground. This can be overcome by setting the motor to less degrees. So now, it is set to 210 degrees and I'll change it to 140 degrees. The result is visible. Now we managed to score a goal. The less number of degrees make the arm stop rotating and the ball go forward instead of towards the ground. Next, let's examine another possibility. I have rotated the motor 180 degrees and put the small arm once again. This time the ball travels a longer distance than in the first experiment. This is due to the fact that the ball hit the motor and bounced upward from it. This can be better observed on slow motion. Here is an example of a team that uses that technique. Except for throwing the ball, you could use pressure created by deforming the LEGO parts to make the shot. Here is an example of a team using such a technique. If we run the video once again but this time on slow motion, we can observe how the four angled beams are deforming while the LEGO technique linear actuator pushes the lever forward, which is pushing the ball. Moving the ball forward it pushes the angled beams apart, which creates pressure. When the ball surpassed its diameter, the parts try to return in their normal position, by which the energy is transferred to the ball and a shot is made. This is quite an interesting method that can be used in various situations. Another quite popular technique is to use rubber bands. Here are two examples of teams using attachments with rubber bands. Basically the attachments represent the small scale catapult like the one showed in the previous tutorials. However, here instead of weight is used, the force from stretching the rubber bands. In both cases, the arm is held by the motor. When the motor is rotated, the arm is released, and the rubber bands push the arm upward, which results in throwing the ball. This is probably the most common way to throw a ball I have seen students do. As a conclusion to the shown techniques, I want to add that it is quite important to make sure that the ball hit the field before going into the net. If you try to score directly, there is a high possibility that after a ball bounced from the ground it will get out from the door. Each consecutive rebound is less in [inaudible] so if your ball has already bounced once, it will be unlikely to get out of the net once it has got in. With this, we will end this tutorial.
Курсове и занятия включващи този Урок
Този Урок е използван в следните курсове и занятия.
FIRST LEGO League Competition. Attachments
This course is a collection of materials for many of the attachments that we've built at FLLCasts before introducing courses. The videos were built as separate different attachments for different competitions and with the following course, we try to give it a structure.
- 60
- 347:26
- 0

FIRST LEGO League 2014 World Class. Example solutions
In this video tutorial we experiment with different ways of solving the sports mission for throwing the ball. We show seven different LEGO MIndstorms EV3 and NXT robot constructions and attachements. Most of the techniques could be applied for any mission involving throwing a ball or an object.
- 16
- 0
- 0
- 3d_rotation 7

FIRST LEGO League (FLL) 2014 World Class. Review of solutions with explanations
These are a couple of structured examples and tutorials of how the missions for FIRST LEGO League 2014 Word class competition could be accomplished. We've gathered recordings and explanations from which students and teacher can learn a lot. There are missions and attachment for rubber bands, lifting with rubber bands, throwing and other interesting and challenging robotics missions from the competition.
- 16
- 85:15
- 0

Sports mission
In this video tutorial we experiment with different ways of solving the sports mission for throwing the ball. We show seven different LEGO MIndstorms EV3 and NXT robot constructions and attachements. Most of the techniques could be applied for any mission involving throwing a ball or an object.
- 1
- 0
- 0
- 3d_rotation 0