Ще ви покажем и друг начин да програмирате робот да се движи назад.
- #377
- 04 Feb 2017
- 3:41
Настройката за мощност
Втората настройка в насочващото блокче (Move steering) управлява мощността на мотора. Измерва се в проценти и може да има стойности от -100% до +100%. Сто процента означава да се използва пълната мощност на мотора. Нулева мощност означава, че моторът не трябва да се движи изобщо.
Отрицателна мощност означава движение назад.
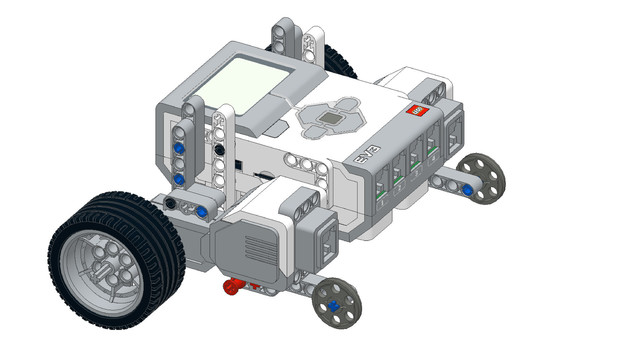
Естествената посока напред за двигател
Важно е да се знае коя е естествената посока напред на двигател, когато конструирате робот и когато планирате как ще използвате конструкцията.

Лесно се запомня: вижте малкото ухо с три отвора до въртящата част на мотора. Започвайки от това ухо, направете кръг във въздуха около двигателя. Това е посоката "напред" на голям мотор.
English
You can make the robot move backward by using minus rotations. But there are also other ways to make the robot move backward. And this also sets the question what is forward and backward from the motor perspective.
In the EV3 software I'll just zoom this block so that you can see it on the screen
we can change the number of the rotations to minus 1 and this will make the robot move backward and we can also change the power. This option here is the power of the motor. And you can think of the power as a value between 0 which means the robot stops, to 100 which means 100% of the power that the motor could output. So, that's the maximum power of the motor. And it's generally a good idea to use 50 because it is round and it won't drain the battery that fast. But if you set -50 like this you can use the slider for setting or you can use the keyboard -50. This will also make the motors move backward. Download and run.
As you can see the whole robot moves backward. And this is the program with the modification for minus power. The next question is what is the default positive power for rotating of the motors. If you take a motor and this motor could be placed on the robot in many different ways. You can place it like this or like this, or like this, or like this. So, in an unlimited amount of configurations. So, you should be able to directly find the positive direction of the motor just by looking at it. And a simple trick for this is if you take the motor and if you place your finger right here at this side of the motor. You can distinguish this side from the other side because they're different. And then what you try to do is move from this side to the bottom with the finger. And this is the positive way of rotating of the motor. You see that you cannot do it in reverse because you'll have to cross the motor but just place your finger here. And this is the positive side. So, even if the motor is placed like this below, you know that when you're programming to move forward it'll rotate like this - from here to here. And you can then customize, modify your program.
Курсове и занятия включващи този Урок
Този Урок е използван в следните курсове и занятия.
EV3 Phi. Introduction to robotics with LEGO Mindstorms
The things that you will be able to do with your EV3 robot by the end of this course are:
Freely move your robot towards desired target;
Avoid obstacles on the path of your robot using sensors;
Follow lines of any shape;
Detecting and picking up objects of any kind;
- 92
- 220:20
- 36

Series of instructions make a program
Задачата е да програмирате робота да се движи напред и назад с все по-малки разстояния.
- 11
- 0
- 4
- 3d_rotation 0

Instructors Remote Training
If you are working with students and you want to introduce Robotics to your class or you want to mentor a FLL team, but you are insecure about your technical knowledge in the Robotics field, then this is the right place for you. Having in mind teachers' busy schedule, we have design two different schedules and added an option to design one just for you. FLLCasts's Mindstorms EV3 Robotics Online Training is the perfect match for any teacher.
After the completion of each task the participant has to upload his solution for verification.
- 183
- 280:11
- 156
How to make the robot move
Нека да разгледаме брика - LEGO Mindstorms EV3 Intelligent Brick. Умната LEGO тухличка.
EV3 брикът е главният компютър на вашия робот. Той има екран, бутони и различни портове.
- 24
- 0
- 11
- 3d_rotation 0

Роботика с LEGO - Ниво 1.0 - Приключение в Космоса
Първото ниво от учебната програма по LEGO роботика за ученици от пети до дванадесети клас.
В нивото се изграждат различни конструкции на роботи. Управляват се моторите така, че роботите да извършват прецизни завои около „земята“ и „луната“. Преодоляваме различни препятствия след като се блъснем в тях благодарение на сензора за допир.
С помощта на сензора за разстояние роботът се движи без да се блъска в заобикалящите го препятствия. Достигаме до понятията цикъл, градуси, среден мотор. Накрая роботите могат да изпълняват едновременно две различни неща - докато изпълняват мисии върху специално изградено поле, третият двигател разчиства засечени обекти.
- 126
- 123:52
- 150

Занятие 1 - Движение като Йо-Йо
Въведение
Днес ще се запознаете със съучениците и преподавателя си, ще се научите как протичат занятията ни, ще конструирате първия си робот и ще се научите как да програмирате робот да се движи. Целта на занятието е да накарате робота да се движи като Йо-Йо. Как се движи едно Йо-Йо?

Ако някога сте притежавали Йо-Йо знаете, че то е предназначено да се спуска и изкачва обратно до ръката ви. Но за да се справи успешно, трябва да движим ръката си така, че да му предадем необходимата скорост. В противен случай, той малко по малко намаля разстоянието, което се връща и накрая спира.
Опитайте се да оставите добри впечатления на съучениците си, защото това са хората, с които ще учите до края на курса.
- 19
- 4
- 9
- 3d_rotation 1
Ниво A - Въведение - Роботика с LEGO
Първото ниво от учебната програма по LEGO роботика за ученици от втори, трети и четвърти клас.
Едно, “пътешествие из космоса”, но с роботи. В нивото се изграждат различни конструкции на роботи. Управляват се моторите така, че роботите да извършват прецизни движения около „земята“, „луната“ и „слънцето”. Преодоляваме различни препятствия след като се блъснем в тях благодарение на сензора за допир. Изграждаме и програмираме роботи, които могат да се сражават и защитават стига това да се наложи.
- 142
- 133:42
- 187

Занятие 2 - Йо-йо
Въведение
Днес ще се научим как да задаваме повече от една команда на робота и ще го накараме да се движи като Йо-Йо. Някой от вас имал ли е Йо-Йо? Как се движи то? Знаехте ли, че преведено от филипински йо-йо означава „да се върне“.
- 18
- 3
- 8
- 3d_rotation 1