

Precautions when building LEGO robots from PDF instructions
When you build from instructions there are a few things that you should be careful about.
- #342
- 18 Jan 2017
When you build from instructions there are a few things that you should be careful about.

Now that you have tried and solved a challenge involving a series of instructions, we would like to share with you a few best practices.

When organizing this course, the behavior expectations should be set at the very beginning of the course.

Remember the passive/active attachment separation that we are making at FLLCasts.com. This applies for all the attachments and in this Episode, we are looking at how to use a passive attachment.

We will cover three ways to transfer your program from the computer to the robot.

Now we have to program the robot. The steps that we will cover are starting the software, writing a program and downloading it to the robot.

What a teacher must look out for, while students are building a robot from instructions.

Now we will create the first program in this course and we will make the robot move forward.

Using the rack depends on the experience of the team. Based on this a different number of gear wheels and racks would be used.

How great is the great attachment for lifting that we built in this course? How many times can it lift the robot without making an error? How great are your attachments and how could you test them? - the answer is simple. Just try 10 times and they should work at least 9 of them as our attachment is.

When we, the teachers, make programs and projects, we give them descriptive names. Let's show you a way to put cool names on your programs.

It this episode we would present you with our attachment for lifting the robot.

Let's review the LEGO Mindstorms EV3 Intelligent Brick
The EV3 brick is the main computer of your LEGO robot and it has a display, a few buttons and various ports.

Here is our solution for preventing torsion and bending of the LEGO Mindstorms EV3 axles.

Before moving forward here is the simple task of building the mechanism and extending the legs. Extend the legs to fifteen LEGO units.
We will introduce a convention, an agreement, how and in which cases we are going to use each types of blocks.

How to align the wheels and how much should you push for this solution?

Let's learn how to use the Sound block.

We will demonstrate an alternative way to make the robot move backward

There were a few problems with the 40 teeth gears that we were using. Let's list some of them

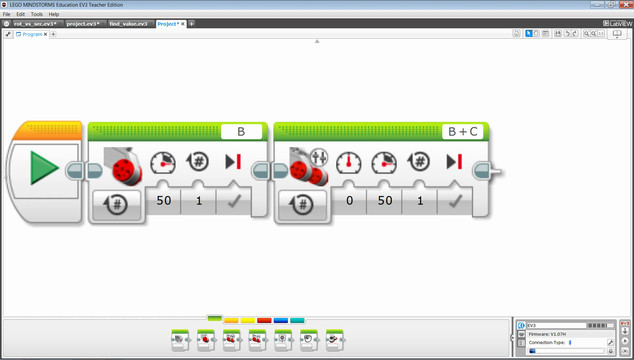
There is the Move Tank programming block in the software. It allows us to set different power to each motor.
In real life, the same concept is used in cars, for example. The traction control systems apply different power to different wheels, so that the car is more stable on the road during turns or on slippery road.

Building a rack is a very important skill during competitions. You should try to build one, learn how to use it and have it as a tool for you next robots. But for this particular BoxRobot, we will not continue with a rack.

The most stressed wheel in our system is the driven wheel. We've already fixed the problem with the driving wheel of the scissor mechanism and now it is time to look at the drive LEGO Mindstorms wheel.

Think of an attachment that leaves the Gecko on the mission model. Don't use the robot attachment that we already have. Just the box robot and the gecko. Nothing should support the Gecko when it is hanged on the mission model.

We will cover the typical reasons why your robot is not moving at all.

In this tutorial, we add another mission to our current program. This mission is - hanging the Gecko from the FIRST LEGO League Animal Allies.

Do your best as a teacher to make sure students are expanding their vocabulary on every occasion.