After we have introduced a menu in the previous video, this video focuses on storing the values in an array. It presents a basic use of arrays.
- #221
- 24 Jul 2016
- 5:39
- LEGO MINDSTORMS, LEGO MINDSTORMS EV3
- World Robot Olympiad 2013 World Heritage, World Robot Olympiad, EV3-G, EV3, WRO 2013, Array, WRO, Programming
English
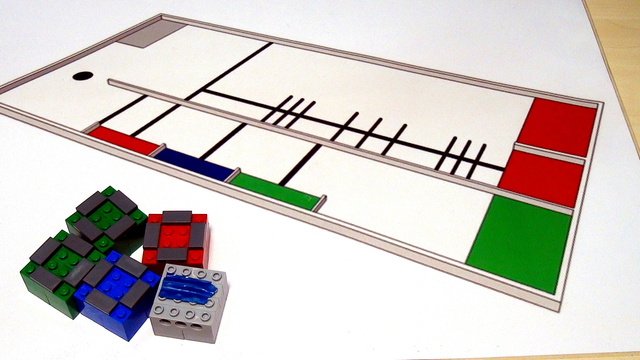
- Previously, we stopped at introducing the array in our program, that's called the InRobot, and it stores the order of the blocks. And in this video, we look at the choice block, how we display blue, green, red on the screen, and how we choose this with the different buttons of the brick.
The purpose of the choice block is to return one for blue, two for green, and three for red. And the program, it's not very difficult, it's just a few switch...switch blocks. And we have our default follow for block color. So initially we display on the screen of the brick blue. And this will be value one. And then, constantly in a loop, we check for the different buttons that are pressed on the brick until we press the enter button. And when we press the enter button, we finish the loop, and we play a small sound. And that's it. And we return the block color that we have chosen. So we can have a condition for finishing the loop that is pressing the enter button, and this is button number two. So, it's actually...yes, bumping. Bumping the enter button. And inside this loop, inside this loop we do two checks. And these two checks are the following: first, we check whether we have pressed...this would be the right button. And this means that we want to change the color that is displayed on the screen. If we want to change the color displayed on the screen with one color above the current one, so the order is blue, green, red, and we want to increment it to move from blue to green, or from green to red. And if we press the red...the right button, we just increment the value of our block color. And this is with the block, block color. We take the value of block color, and we add one to this value, and that's the program. We finish, and we can no longer increment if we are on red. So, if the block color is already three, we don't want to increment, so we check is the block color smaller than three, and if it is smaller than three, we increment it's value. If we press that left button, again I'll move to the other part of the program, if we don't press the right button, it means that we have pressed probably the left button. And if we have pressed the left button, then we must decrement the value of block color. And we can decrement this with the following construction: Block color, mathematical block for subtraction, and we write again at block color. So we read, we subtract one, we write in block color. And in this way to switch blocks, we either increment, or decrement the block color. We increment or we decrement the block color, and it is in the range from one to three. And at the end, depending on what is the color that we have selected, one, two, or three, we write on the screen blue, green, or red. If the color is blue, we write one, if the color is green, we write two... if the value is two, we write green, and if the value is three, we write red. Let's again see this program in action on our brick. Download the program, and again, we display on the color, by default blue. And we can select, we can increment, with the right button, and move to green and red, or we can decrement and move from red to green to blue, or from blue to green to red. And with the middle, with the enter button, we just select, and we select green. And we see, we hear a sound. Then we again select, and this will continue five times because we have five blocks. Now, what we have prepared are a number of tasks below the video that you can take, and for example, extend this block for manual for other colors, or extend the number of blocks, or change some of the ways these blocks behave so that you can experiment and learn with it. Check out the tasks below, prepare a video, and share it with us in the comments section below. In the next video, we'll continue with the other parts of this robot.
Courses and lessons with this Tutorial
This Tutorial is used in the following courses and lessons
World Robotics Olympiad (WRO) 2013 Elementary. Review of solutions with explanations
Presenting a sequence of videos, materials and programs for accomplishing the WRO Elementary 2013. We present arrays, menus, counting colors and many more.
- 11
- 57:48
- 0

Store in Arrays
After we have introduced a menu in the previous video, this video focuses on storing the values in an array. It presents a basic use of arrays.
- 1
- 0
- 0
- 3d_rotation 0