Instead of aligning forward as in the previous tutorial we felt there is a need to demonstrate how we could align backward when moving with the robot. This is not a rare case. The attachments of the robot are generally at the front of the robot and especially during FIRST LEGO League competitions the robot must move backward very often. It is helpful to have in your toolbox the ability to align backward with the robot.
- #1941
- 20 Jul 2022
- 4:32
- LEGO Education SPIKE Prime
- Align, Scratch, LEGO Education SPIKE App Word Blocks 2, Programming, Light and Color Sensor
How to use this tutorial?
Download and run the program. See if you can successfully align to a line while moving backward
English
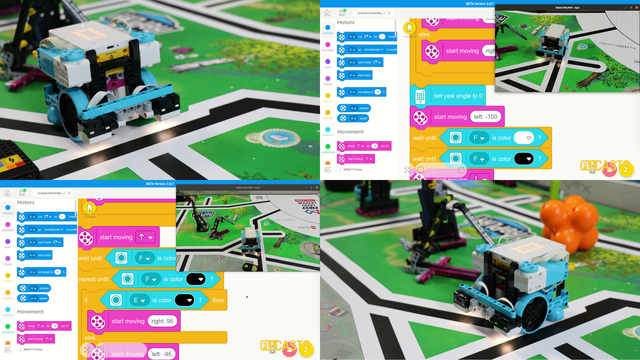
With this tutorial we align again to a line, but backwards and we are starting to get into the really interesting and advanced topics of the FIRST LEGO League competitions and how can you build reliable and consistent robots? We move with the robots, it will align, but this time moving backwards.
Let's see how it works.
Start the robot, move backward and we align. We first saw the line with one of the sensors, then we stopped the wheel and we turned only the other wheel on the other side of the robot. And in this way the robot aligns to the line and it doesn't matter how we start the robot. On the right you can see the recording of the tutorial, and on the left we have the program. And this program is very similar to the previous program, where we were aligning to the line but moving forward. Now we are moving backward and it's the same program. It's the same program, the same concept. We see that the program has two blocks for when program starts. This means that in parallel we execute two separate threats. This is where the whole concept of programming the robot gets really interesting and kind of advanced, because now we have two separate threats that are changing the behavior of the robot simultaneously. When the program starts, first we set the speed to motor A to 20% and we start motor A and we wait. We start motor A backward and wait. We wait until sensor E detects a black line. And this here is sensor E, the one that's on the left. And motor A is the one on the left of the robot, not the recording. And this is how we know we could reach the line and stop there. At the same time, what we see here in parallel, we do the same with motor B. We move with motor B until we reach the black color of the sensor F. So this is how we know we've reached a line. So here, let's see how the robot behaves. Again, we'll start, we move with both motors backward until one of the sensors sees the line. And as the sensor sees the line, we stop with this motor and we rotate only with the other motor. That's it. Again from the other side, remove.
And at this moment, exactly here, this sequence of blocks, the one on the left, it stops because we've already detected a black color with sensor E, and now only the other side of the program, the program that's controlling the motor B, only this sequence of blocks is working. We continue and we stop right here. Perfect. I hope that with this tutorial you'll get a better understanding of how we can align. And previous tutorial was about aligning, moving forward. This one is aligning, moving backward, because on the FIRST LEGO League competition you don't know where you are on the field and it's good to have both of the programs and to be able to use them with your LEGO Education SPIKE program. See you in the next tutorial.
Courses and lessons with this Tutorial
This Tutorial is used in the following courses and lessons
LEGO Education SPIKE Prime Programming for Competitions with Word Blocks
Two fundamental concepts are essential for robotics competitions: ensuring the robot consistently navigates and positions itself accurately on the field and designing attachments that complete missions once the robot reaches its target. This course focuses on the first aspect - precise navigation and positioning - while the second is covered across the entire FLLCasts platform, starting with the FIRST LEGO League with LEGO Education SPIKE Prime. "Challenge" competition for 9-16 years old
The goal of this course is to help you learn how to program LEGO Education SPIKE Prime robots to operate consistently and reliably in competition settings. We use LEGO Education SPIKE App Word Blocks, a Scratch-based programming language, to teach key techniques applicable to FIRST LEGO League and World Robot Olympiad competitions. Topics covered include different methods for line following, such as fast, slow, smooth, and using multiple states, as well as techniques for line alignment, double alignment, and maintaining a straight path using the motion sensor.
- 40
- 188:21
- 19

Backward align to a line with two sensors
Instead of aligning forward as in the previous tutorial we felt there is a need to demonstrate how we could align backward when moving with the robot. This is not a rare case. The attachments of the robot are generally at the front of the robot and especially during FIRST LEGO League competitions the robot must move backward very often. It is helpful to have in your toolbox the ability to align backward with the robot.
- 2
- 0
- 1
- 3d_rotation 1