

Starting EV3-G Software. Projects and Programs
Now we have to program the robot. The steps that we will cover are starting the software, writing a program and downloading it to the robot.
- #364
- 04 Feb 2017
Now we have to program the robot. The steps that we will cover are starting the software, writing a program and downloading it to the robot.

Here are some guidelines for assigning tasks to students:
Use visible references on the floor. If the floor is tiled, use the tiles. If there are lines, use them as guides. Always clearly mark both the starting point and the finish line.
Students may forget where the start and end points are, so it is important for you, as the teacher, to mark them clearly.
Use one testing area for every 10–12 students and teach them to wait their turn in line. This helps keep the activity organized and fair for everyone.
A task distance of around 50 cm (20 inches) works well. You can also choose a different distance or decide together with the students. Any distance can work, especially if it has meaning.
For example, you can use a meaningful challenge like: “Move the robot as far as your height.”
Decide in advance what counts as a successful result. For example, is 42 cm acceptable? Is 49 cm enough? Is 55 cm too far?
Set clear expectations and help students understand the importance of precision. At the same time, encourage them to try again and improve their results.

We will demonstrate an alternative way to make the robot move backward

Pivot turns require fractions of rotations, a number between 1 and 2. Sometimes it is more convenient to use degrees.
In the software, you can change the "move block" to use degrees.

Why we will never use seconds in our lessons.

In this video tutorial we use a LEGO MINDSTORMS Robot inventor robot and we do an experiment and a demonstration with it. We demonstrate what is the difference in the consistency and accuracy of the robot when we move slow and when we move fast. For FLL, WRO competitions there is always this balance between moving fast and moving slow.
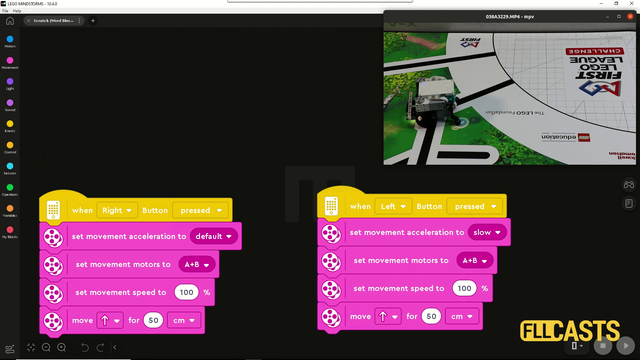
In this video tutorial we are demonstrating the impact of slow and fast acceleration on the robot. In the Scratch program there is an acceleration block for fast and slow acceleration. The robot behaves in different way. Let's explore them so that you know what to use for FIRST LEGO League competitions.

With this first tutorial on the Motion Sensor in the LEGO MINDSTORMS Robot Inventor course we demonstrate the basic algorithm for moving in a straight line with the Motion Sensor. From here all the other algorithms are modifications, and if you know the basic it will be easier to tweak the behavior for your particular challenge

This is a 10 out of 10 tutorial, demonstrating the consistency and reliability of the active attachment for switching the engine in this mission. The power is transferred through a system of gear wheels to a lever at the end. We presume that the robot is already positioned.

In this video tutorial, we use the Unload Cargo Ship mission from FIRST LEGO League 2021 Cargo Connect robotics competition to demonstrate how we program the robot to keep a straight line while moving. Do we need that for this mission? Probably not, but we do it either way to demonstrate the solution in a fairly simple mission. The program uses the motion sensor to auto-correct the errors the robot is making while moving.

In this video tutorial, we demonstrate an attachment that is activated when we reach the mission model. That means the attachment is not activated by a motor but by the movement of the robot. We accomplish the FIRST LEGO League 2021-2022 Cargo Connect Home Delivery mission model, where we have to move and bring cargo to the mission model and leave the cargo there.

This is a 10 out of 10 tutorial, where we demonstrate the consistency and reliability of an attachment activated when we reach the mission model. We do not use a motor. We activate the attachment by pushing the robot to the mission model of the FIRST LEGO League 2021-2022 Cargo Connect Home Delivery Mission.

"Sometimes it works, sometimes it does not work" - this is the most common case in FIRST LEGO League competitions. In this tutorial, we demonstrate and discuss such a case where the first part of accomplishing the mission always works but the second part has about 60-70% success rate. The robot is not very consistent. Let's take a moment to see it and explain why so that we can resolve the problem in the next lesson.

In this video tutorial, we accomplish the FIRST LEGO League 2021-2022 mission called Platooning Trucks. The goal is to connect the two mission models (trucks) to each other and then connect them both to the bridge. It's quite an interesting mission as it involves three mission models.
