With this first tutorial on the Motion Sensor in the LEGO MINDSTORMS Robot Inventor course we demonstrate the basic algorithm for moving in a straight line with the Motion Sensor. From here all the other algorithms are modifications, and if you know the basic it will be easier to tweak the behavior for your particular challenge
- #1962
- 01 Nov 2022
- 7:22
- LEGO MINDSTORMS Robot Inventor
- Move straight, FIRST LEGO League, World Robot Olympiad, Scratch, LEGO MINDSTORMS App Word Blocks, Sensors, Motion Sensor, Gyro Sensor
Motion sensor
The motion sensor detects the angle on which it is rotated relative to a starting position. We are using the 'yaw' angle that measures the rotation in the horizontal plane and is practically the most useful one for competition.
English
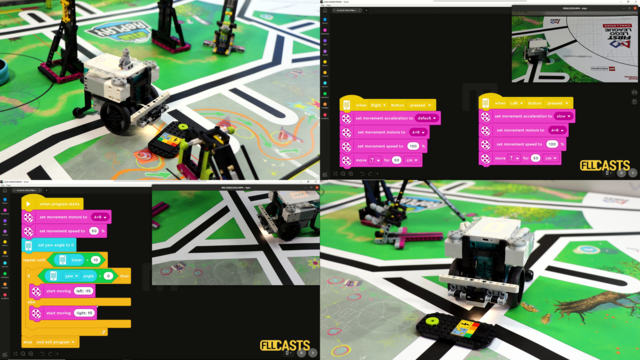
This is our first tutorial with LEGO MINDSTORMS Robot Inventor in this course, in which we use the sensor to move the robot in a straight line, to move the robot forward. That's the goal of our first motion sensor tutorial. Start the program and the robot moves forward. And you can see that it moves. Slightly left to the right or left to the right. And it's a general algorithm for moving forward with the motion sensor. And this is where the robot arrives. So there are many ways and many configurations to program the robot to move with the motion sensor. We will start with the most basic one, really the basic one and the others, they are kind of similar. You just stay on the same level and modify the configuration. Here is where the robot arrived the second time, almost at the same place. Before we get into the programming, I think it's important to see how the robot behaves and to zoom on the wheels. You can see the robot moves to the left and to the right, to the left and to the right. Here it is again.
One of the wheels is moving while the other is topped.
Let's explore the program. On the left we have the program, and in this program we use some new interesting blocks and we'll get to them like the repeat until. But on the left is a program and on the right is the recording of our robot. So what happens in our program? This is a program that uses the motion sensor. It was previously known in other previous sets, the Gyro sensor. Now, in this robot, it's called the motion sensor. And the motion sensor, it can detect three angles depending on the plane in which the robot is rotated. So if we are in the horizontal plane, we get this yaw angle. And initially, what we need to do is we need to set this angle to zero in the integration. So movement to motors A and B, A and B will be the motors that we are moving speed to 50 and your angle to zero, which means that when we start right here, when we press and before we start, we will be at position zero for the angle and this will be the forward direction. From now on, we will try to maintain this direction. That's the purpose of setting this set yaw angle to zero. After that what we are doing and this whole behavior that we see right here of the robot, it's in a loop. And this loop in software is called repeat until loop and we repeat until until a condition occurs. In this condition is that the timer should be more than 10. From the start of the program, 10 seconds should pass before we stop with the repeat until. So we are repeating until 10 seconds have passed. What we do after that is interesting. It's the use of the sensor, because. The repeat until block in its. Condition, it doesn't use yaw Angle and Sensor. So in the repeat until what we do is the following if the robot or the robot starts and it starts. Moving here it is. We start the program and we go forward. Right here. And you see that the moment we go forward, what happens is that one of the wheels is slightly faster than the other. Probably the friction is different. Probably there is more power to the motor. We don't know, but it happens. And it Always happens so we can derive that one of the Motors will behave differently than the other. At the moment this happens and you can see that one of the wheels right here is rotating already. And what we do is the following if your angle is more than zero, then start moving to the left. If your angle is less than zero, then start moving to the right. Now we go and because yaw angle initially, when the robot has started, is less than zero, we rotated less than. Zero, we start moving to the right here it is already more than zero and we start moving to the left. Less than zero. More than zero. Less than zero. More than zero. And because of this, the robot moves, and it kind of keeps the straight line. Now, that's not the perfect solution. But from now on, that's the basic algorithm. And if we know the basic algorithm, what we can do is that we can configure these turns and we can make the robot move in a different, more smooth way. And this is where the magic happens. When we start configuring and experimenting with these values here, which should be dependent on the robot on the mission on the construction should it be -95 or 90 and that's one of my recommendations here: download this program, as it is and try to experiment with this start moving left to -95 and start moving right 95 values. Put different values there see what happens try with -100 try with -80 and try to keep them the same so if here it is -80 then right should be 80. So try to keep them in sync with those values. And as you experiment. You can get a sense of how accurate the robot is and how easy it is to move in a straight line. By using this algorithm. Hope this is helpful, and I hope I see you in the next tutorial.
Courses and lessons with this Tutorial
This Tutorial is used in the following courses and lessons
LEGO MINDSTORMS Robot Inventor Programming for competition with Word Blocks
To successfully advance at competitions we need to understand two concepts - how to reliably and consistently navigate the field and position the robot exactly where we need it to be on every run, and how to build attachments that would accomplish a mission model once we have reached it. This course is focused on the first part. The second part is the whole FLLCasts platform, but start at FIRST LEGO League with LEGO Mindstorms Robot Inventor. "Challenge" competition for 9-16 years old.
The goal of this course is to help you learn to program LEGO Robots using Scratch and make them behave consistently and reliably during competitions. As a language we use LEGO MINDSTORMS App Word Blocks which is based on Scratch. We look at a lot of concepts that could be used for FIRST LEGO League and World Robot Olympiad competitions - for example, how to follow a line fast, slow, in a smooth way, with 5 states. Also, how to align to lines, how to do double align, how to keep a straight line with a motion sensor.
Unfortunately, LEGO discontinued the robot series during the making of this course which is why it's kind of shortish. You could use the SPIKE Prime course for a more in-depth analysis.
- 8
- 38:50
- 5

Motion sensor - move forward
With this first tutorial on the Motion Sensor in the LEGO MINDSTORMS Robot Inventor course we demonstrate the basic algorithm for moving in a straight line with the Motion Sensor. From here all the other algorithms are modifications, and if you know the basic it will be easier to tweak the behavior for your particular challenge
- 1
- 0
- 1
- 3d_rotation 1