

Three types of generations. Robotics Game of Life
There are basically three type of generations in the robotics game of life.
- #270
- 10 Mar 2016
There are basically three type of generations in the robotics game of life.

One of the smartest things you could do in any software program is to extract logic in small reusable, simple, understandable units. In EV3-G these are called Blocks and we are going to extract the logic for finding a minimum and maximum for each of the sensors in a new block.

A common question is how to display arrays on the LEGO Mindstorms EV3 brick screen. Displaying values from an array is not different from any other display operation. In this tutorial, we would look at displaying two specific values. The minimum and the maximum for a specific sensor from the Advance Calibration Course Section

What should you do as a teacher when the students are calculating the gear ratios and number of needed rotations?

We will share the idea behind that challenge and how to conduct the challenge in a classroom.
Conenct the motors of the VEX EDR motor to the VEX Corted Controller. For connecting we need the motor drivers.

After we've download the software we must install it and most importantly configure it. Without propertly configuring the software it would be difficult to use the Cortex Controller.

Let's look at what game of life actually is, what are the rules and how to play the game on paper

In the first part we built our first 3D LEGO model. Today we will smooth the model we have created and go through the process of creating PDF instructions for building it.

In this video tutorial, we demonstrate how to release the cargo of a mission model. This mission model is an Airplane. We have to push a lever down to release it. We use an active attachment with a gear wheel.

In this video tutorial we will reach a specific location on the field 10 times. This programs demonstrates the accuracy and consistency of a program that used the Motion Sensor to detect the angle at which the robot rotates. At the end of the tutorial you will have a visual and clear picture of what you could expect from this basic usage in terms of consistency and accuracy. This might be enough for some cases and it might not be enough for others.
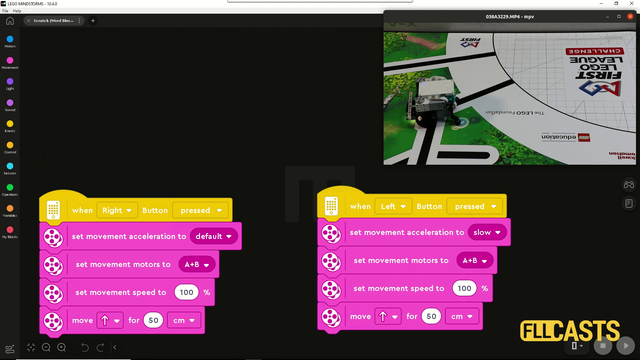
In this video tutorial we are demonstrating the impact of slow and fast acceleration on the robot. In the Scratch program there is an acceleration block for fast and slow acceleration. The robot behaves in different way. Let's explore them so that you know what to use for FIRST LEGO League competitions.

Following the Advanced Sensor Calibration course section, it is time to extract the logic for getting a calibrated value into a new block. This block will have an input and on this input, we give the port number. The block will return the calibrated value for this port number. We've built all the other blocks only because of this almost final video here.

To correctly upload the blinking diode program to the controller we must first check some of the configurations of software. These are the "selected controller" and COM port

In this video lesson, we will show you how to build a menu as a MyBlock in LEGO Mindstorms NXG-G. Having a menu is a must at robotics competitions since it saves time and gives easy access to program functionalities.

This lesson shows how you could use the rotation sensors of the motors of a LEGO MINDSTORMS NXT robot. This technique is very powerful during the competition. We give ideas on how to show the value of the sensor on the display, how to check if you have completed a given job or you are still doing it and other even more advanced topics. Understanding the rotation sensor is a must if you want to use the full capabilities of the motors.

This is a 10 out of 10 tutorial demonstrating the consistency and reliability of a LEGO Education SPIKE Prime robot when the robot delivers a mission model to a specific position on the field.

For Level 3 from from "FLLCasts Certified VEX IQ Robot Driver - Class R1" certification path you need to slalom along the field. Start on the border of the field move forward until the first obstacle. Turn after it, continue forward, then turn around the second obstacle, continue forward and turn around the last obstacle. Again continue forward, turn around the second obstacle, continue straight around the first obstacle and sprint towards the finish line at the border of the field.

Every electronics tutorial, book or course about Raspberry Pi or Arduino will use a motor driver. Very few of the courses will actually explain why do you need a Motor Driver, what is it for?

When you first start the EV3 brick, you see the recent programs menu. Let's see what it is all about.

In this episode of the Basic NXT Programming series I will cover the sound sensor. I will explain how to program the sound sensor, stop on common problems faced, when the sound sensor is used and finally we will build a program that will allow us to control the robot's speed through the volume of the sound.

In this video tutorial we take a next step in programming reliable and consistent robots and this is to learn how to stop at a second intersection. We need this because most of the time when we want to reach a mission model on a robotics competition field, the model will be located away from us and we must use all kind of technique to reach it. In this tutorial - we stop at a second intersection.

One of the very common tasks on different FIRST Technical Challenge competitions is to collect objects. In this case, these are colourful specifically shaped plastic object or in simple terms - balls.

Now that we know how to make the robot move forward let's see we can make it move backward.

One of the interesting things in this sequence of videos is the program. The program detects when the system has reached the maximum speed and then stops the motor from rotating. We detect this with the EV3-G software

Level 2 from "FLLCasts Certified VEX IQ Robot Driver - Class R1" certification path is to start on the border of the field, move through to the last obstacle, turn and return back to the first one. turn once again and go up to the second one, turn around one last time and sprint towards the finish line at the border of the field.
