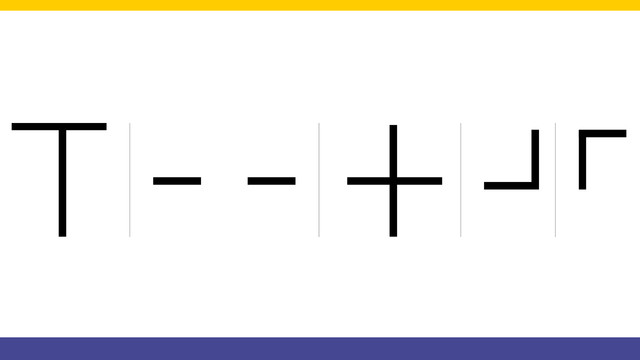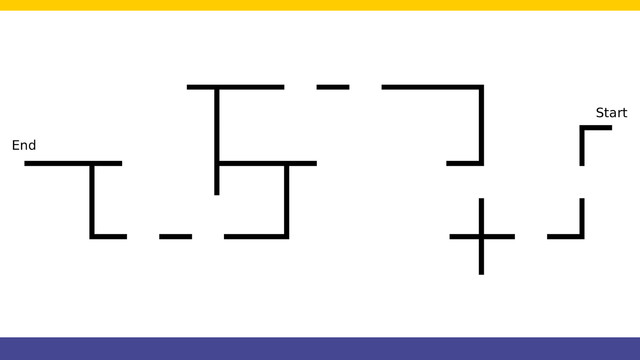

Gapped & Crossed Line Following. Part 9. Crossed Sections
We can Turn Right. We can Turn Left. How do we decide which way to go if there are lines both to the left and to the right. Check out the video.
- #212
- 09 Mar 2016


We can Turn Right. We can Turn Left. How do we decide which way to go if there are lines both to the left and to the right. Check out the video.


Next state in our state machine programming pattern is the "Turn Left" state and the corresponding behaviour.


Next important state is Turn Right with our robot. This happens when we detect a line on the right.


The last fifth construction is larger compared to the previous constructions. It is wider. It has four sensors and you can take a larger load all by keeping the robot stable.


We've detected the gap. It's time to move over it. This is difficult because we have to detect where the line is after the 0.1 meters gap on the line following field.


Probably the robot I like the most from this series of five robots. See the video to understand why and what is interesting and special about this robot.


It's inevitable. While following this gapped line we would reach a gap. The robot must somehow understand that there is a gap and must make a decision on what to do. For detecting the gap we use the Rotation Sensor. Not the most popular, but very convenient in many cases. Check out the video.


The final video from the course. The robot escapes the state where it is lost. This happens if it can not continue in any direction.


The third robot has the brick and motors placed vertically. This is quite unusual and difficult, but the construction is very powerful because it saves space.


We follow a line. We start from the Smooth Proportional Line Following program and modify it a little for this program. We follow the line with the middle sensor attached on port 2.

The second construction of the series along with a comparison with the first construction. The new robot requires more parts, but has a few more advantages.


We extract the Proportional Line Following algorithm into a new block with parameters. This allows us to experiment with the Threshold, Constant Speed and Relaxation Coefficient. You can now easily use the block in you other programs without having to implement it.

Five different robot chassis. This is the goal of the series. To present ideas for different design of the robots and especially the robot bases. If the base is stable and balanced, then in could easily be extended. Let's start with the most simple of the five.


We list the number of decisions that the robot is making while following the line. Then, we group them and decide on the number of sensors to be used.

Looking at the field we must first think of a strategy of solving this line following problem. There are rules that the robot must follow and these rules should be programmed in the robot.

We start a course for following a line with crosses and gaps. This is a challenge that one of the users at FLLCasts.com was trying to accomplish and asked us for advice. We present the whole challenge to you step-by-step. But first, let's also see the whole run of the line following algorithm. With this course, we also do an introduction of using State Machine as a programming pattern.

Sometimes you could just throw a ball from base and solve a competition. Or at least many teams think so. In this video we would explore a very simple attachment for throwing balls from base. Can you use this for other missions? - we think so. Check out the video.


Using a number of axles, beams and rubber bands we collect many loops at once. This is an important part of every competition, mostly of the FIRST LEGO League.


In this second part we continue with the next few tasks from the FIRST LEGO League (FLL) 2013 competition. Using the same rubber band attachment we lift the house and collect a few of the humans and cargoes.


Accomplishing many tasks with a single attachment for the FIRST LEGO League (FLL) 2013 competition. The attachments are using many rubber bands. What is interesting is that it collects/lift/triggers many things at the same time. This is how you could save time and parts during a competition.


This is the oldest and most classic problem in the field of robotics. Shaft in an opening. Basically robotics and in improvement of many of the actuators is about improving the solutions to such problems. Let's see how we ca do this using a mission model from the FIRST LEGO League (FLL) competition.


In the final video we explore how to trigger the release of the attachment with just a rubber band. The release is triggered with a gear wheel that rotates in a specific way. This saves speed, does not require additional LEGO Mindstorms motor and is precise enough for a competition.


This second part continues with importing two previously developed in Episode 53 blocks into our program. With them we can for align to lines. We program the robot to align to the cross line and start following it.


How do you detect a cross-section and move from following the main line to following the crossing line. In this series of video tutorials we are starting with a very simple solution that could work in most of the cases. It is especially useful for the FIRST LEGO League Trash Trek competition where there is such a section.


Last part of the series. The final touch of the program makes sure that it works and is following the line with the LEGO Mindstorms EV3 Color Sensor in a smooth and fast way.


Continuing with the Proportional algorithm for following lines. Smooth and stable this is the first part of the PID.


Third, and last video of this series on how to use ONE attachment to solve the FLL 2014 World Class missions.