This tutorial explains the use of motion and light/color sensors to accomplish a complex mission split into three parts. It gets into detail about how we keep a straight line with the motion sensor, follow a line with the color sensors, and transition between different parts of the program by aligning and detecting lines with the sensor. The goal is to get to a reliable and consistent behavior of the robot. On top of that, it is configurable, as we've left a few parameters that could be set to configure the behavior for a specific robot, venue, lighting, battery level, and wheels friction.
- #2089
- 21 Feb 2023
- 13:24
- LEGO Education SPIKE Prime
- Pull, Line follow, Push, Lever, Move straight, Auto-correct, Run on rails, FIRST LEGO League, FIRST LEGO League 2021-2022 Cargo Connect, Attachments, Gears, LEGO Education SPIKE App Word Blocks 2, Scratch, Sensors, Light and Color Sensor, Motion Sensor
Popular demand
Most of the questions we receive are around more complex programs and behaviors that are as close as possible to real competitions. Following a line on your own is easy. Moving straight is easy. Connecting the two to accomplish a mission that's split into three parts is what's difficult. This tutorial tries to explain how we've done it.
Previous tries with fewer sensors
There is a previous try for the same mission, but it is with fewer sensors. When published it will be available at FLL 2021: Two actions attachment - how to accomplish the Train Tracks mission. The trickiest part of the tutorial is how we transition between the three parts of the program. To do that, we look for lines we can detect and thus know where we are. Even more, we look for a sequence of lines - black and then white. We don't just look for a 'black' line. We look for a whole sequence. In this way, we know exactly where we are and thus reduce the number of times the robot makes an error.
English
In this video tutorial we accomplish a mission model that requires two actions: first fixing the tracks and then we push this train to the other end. And what's different about previous lesson is that this time we use a lot more sensors in the program for this LEGO Education SPIKE Prime robot. A lot more sensors and let's see how consistent this will be. Position the robot, start, move forward, get back then we follow a line, which is different.
Then we rotate and we push on the train. That's it. The program again is split in three parts, but this time in all three parts we are using sensors. Let's try it again. Let's say that robot has reached this position. We move forward, we use the motion sensor to keep a straight line. Then we catch the black line and we follow it.
That's it. Now we look into the program and we discuss how it works.
On the left we have the program, on the right we have the recording and for the program it starts in the usual way. We set movement speed to 50 and we've discussed this in the previous tutorial. It gives us a chance to have a single place where we can configure this variable. We can set the value here and it will be propagated to the other place. So we change a single place and we can experiment. Then we continue with the initialization. We set movement modules to A and B. Movement speed to movement speed, movement acceleration to very slow. Motor D power is set to 50, yaw angle is reset and relative position of A is set to zero. This here is the initialization of our robot. Now comes the interesting part. We've decided to follow to keep a straight line when we move forward with the robot. And we've discussed this algorithm many times in details and you can check the previous tutorial from the course just to make sure that you can revise it here short explanation we move forward. How do we move forward? We constantly detect the yaw angle. Here it is. We start the robot we constantly detect the yaw angle and if the robot makes a mistake, we compensate for this mistake. You saw how here the robot turned slightly to the right and we immediately compensated for this mistake. You can see how the beam, the beam here is not aligned to the black line but then as we continue forward, it is aligned, which is cool. That's the purpose. If the yaw angle is positive, we set movements speed to motor, to one of the motors to 45, to the other motors to 55. For example, with the yaw angle is like five degrees. And in this way, if the robot moves slightly to the right, then motor B, which is on the right, will move faster, and motor A will move slower. And this will make the robot compensate. We get to the end, we stop moving right here we stop moving. Then we initiate the attachment at the top, go down, go up, and then we move back for 20 cm. We've left this here on purpose. What you could do is try now to implement this move lock using the motion sensor and the algorithm for keeping a straight line. We move back for about 20. We stop here. Here it is, the place that we stop. We move left until the yaw angle detects something like 65 degrees. It doesn't matter that much because we'll be using a sensor. And we are right here. Stop moving. Now we should get to the other side of the mission model and push on the train back. But to get to the other side, what we want to do is the following trick. We have a couple of black lines here. These are the black line, and we can move forward. Detect this black line right here, then follow it, and then detect this black line. And when we get to this black line, we can turn right. We know that we are at the other end of the train tract model. We move forward, detect the first black line, then the second, then we follow, and then the second end. That's a more advanced use of the light sensor. When we detect the first black line, our idea is the following. Let's do it in the following pane. Let's move forward, detect the black line, then detect the white line. This line here, that's after the black line. And then follow the black line, but on the right side. Let's see how this works in the program. What we do is we repeat this block for keeping a straight line until we detect black. Move forward until we detect black. And here we see how the light sensor detects black. It is right here. It detects black, which is cool, but we want to detect the white part. And we want to follow the black line on the right. So we continue with the robot, but this time waiting for white. Right here, same algorithm. We continue moving forward, but this time we wait for sensor F, which is the right sensor to detect white.
And we stopped moving. Here it is. This is the place right here. We stopped moving. So we moved forward until we detect black and then white. And the next interesting part of our program is how do we follow the line? It's this algorithm here. You can see how we repeat some logic until sensor e. Sensor E detects black. Sensor E is the left sensor and it should move forward. The robot should move forward until sensor E detects black. This black line here, this is the moment at which with know "ah, we've reach the other end of the train track mission". The algorithms is the following. We detect the reflected light of sensor F. Sensor F is now on white. The reflected light from a white part of the field is large. Let's say that it's probably around 50, 60, 70, that's the reflected light. So let's say it's 70. If it is 70. Then we have 56. -70 which will give us -14 -14 in this calculation here. And if we multiply this -14, by three we get something around -42 and because the value. Is -42, we will move slightly to the left. Why because minus here in this block means move to the left and plus value means move to the right. So if if it is zero, it will move just forward. But if it is left, right, if it is a negative, it will move to the left. If it is positive, it will move to the right now, that's one way to move with the robots. That's one way to move with the robots with the robots and to follow the line. And we decided to demonstrate this way here. There are other ways. And I would advise you to take a look at the LEGO Education SPIKE Prime programming course, where we get into more details. Let's continue.
We move slightly to the left. Until the sensor detects black, then we move to the right, then we move to the left. Then we move to the right, move to the left, right, left, right, left, right. And this algorithm continues until we detect with sensor E, the left sensor on the other side, the black line. How can we improve this algorithm? We can improve it by adding a constant value for moving forward. But that's the purpose of another tutorial. At the end, we stop and we turn left. We turn right, we stop right here and turn right. We turn right until the Yaw angle is more than 75. Yaw angle more than 75 right here. And we stop moving. We set movement speed. We go forward this time, go forward, we detect the line and we follow the line with sensor E, which is the left sensor. So, going to this side of the train track mission, we use the right sensor. Now, when we are returning we use the left sensor. We just move forward following the line using the same algorithm. These values here, 58, two, this value here, 56, three. These are values that we can configure for our robot, for our case, for how fast do we want and how sharp do we want the turns to be. 56 is the value that we get as a minimum value between black and white. Here we've experimented with 58 for our robot, it's about there. For your robot the values might be a little different. Continue until we get to the end. That's it. It was a rather long explanation of this program and we've limited ourselves to using the motion sensor and the light sensor. We use the motion sensor when we get to the mission model and then the light sensor when we follow the black line, detect the intersection here and follow the black line back and we've used a simple algorithm for following a line. Now, there are more advanced algorithms, of course, for this tutorial, we decided to stick to this one. I hope you enjoy it and you learned something. And I'll see you in the next tutorial.
Курсове и занятия включващи този Урок
Този Урок е използван в следните курсове и занятия.
FIRST LEGO League 2021-2022 Cargo Connect solutions and review with LEGO Education SPIKE Prime
In this course, we demonstrate and explain example solutions for the FIRST LEGO League 2021-2022 Cargo Connect competition. Just like every year, we share solutions only after the season is over. In this course, you will find examples and principles of building attachments and will learn how to program consistent and reliable robots for each mission. You can follow the course, and as you go through each mission, try to replicate the solutions to understand the programs and explanations. Upon completion of the course, you will have many new ideas about how to approach the missions in every FLL robotics competition and how to help your team score more points.
Before starting this course, we suggest you go through the FIRST LEGO League robot game guide
- 55
- 181:18
- 34
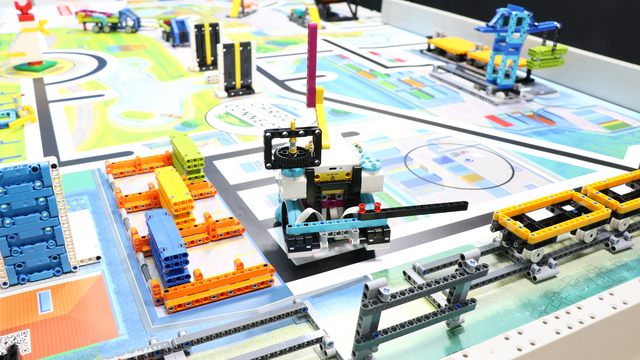
M09. Train Tracks - 100% consistent behavior with more sensors
This tutorial explains the use of motion and light/color sensors to accomplish a complex mission split into three parts. It gets into detail about how we keep a straight line with the motion sensor, follow a line with the color sensors, and transition between different parts of the program by aligning and detecting lines with the sensor. The goal is to get to a reliable and consistent behavior of the robot. On top of that, it is configurable, as we've left a few parameters that could be set to configure the behavior for a specific robot, venue, lighting, battery level, and wheels friction.
- 3
- 1
- 2
- 3d_rotation 3