In this video tutorial we start with the basic of the basic, eg. how to move. We use the block from LEGO Education SPIKE Prime Word Blocks software. It is based on Scratch. The goal of the tutorial is to demonstrate how we can move and to teach something very important - the robot moves inaccurately
- #1898
- 10 May 2022
- 6:17
Inaccuracy in the robot behavior
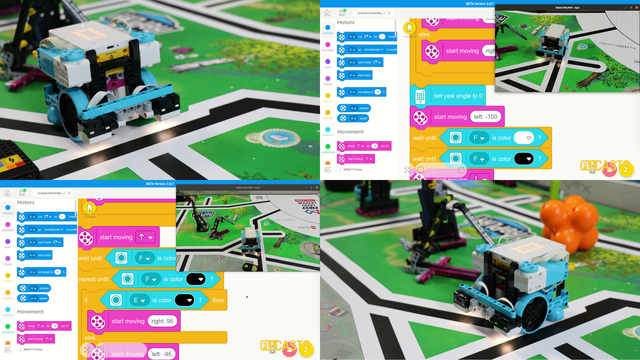
This and the next few tutorials in the course will use the block for moving and will demonstrate the inaccuracy of the robot. Many times for FIRST LEGO League competitions it is easy to start implementing programs that use the blocks for moving without any sensors. This is easy, it is fast and it could get you some results. The issue is that these result will be inaccurate. Nevertheless we should move through the whole topic of moving with the robot and see how and why the robot is not turning correctly and what we could do to mitigate this. In the program we are moving forward, turn, forward. Do you think we would arrive at the same place every time we run the program? Check out the tutorial
How to use this tutorial
Build the robot, download the program and run the program. See for yourself how accurate and consistent the robot behavior is
English
This is the first tutorial from our LEGO Education Spike Prime programming course. We use LEGO Education Spike Prime and we try to move with the robot and place it some somewhere on the field. That's the first program basically for any FIRST LEGO League competition. In this particular tutorial, we've developed a program where the robot moves forward, turns and moves forward and stops at the end. We mark how the robot is positioned at the end of the program. and our goal with this tutorial and the first thing that we want to clear with you is that just using the Motors and moving with the robot on the field, it is not very precise. And on every run you get a different result. Of course, in the second part of the tutorial, we'll enter into more details about programming and we'll look at the different blocks that the scratch based software from LEGO Education SPIKE Prime provides for us to develop different programs for this robot. But what you should remember from the start is that just using the blocks for moving with the Motors is not enough and will not have a very precise robot, a robot that's consistent in its behavior. Later in the course, we'll develop different programs that use different sensors in order to make them more accurate. But for now, just a LEGO Education Spike Prime and simple program for moving with the Motors. Let's see how it works. In the second part of the video tutorial, we'll look at how we develop the program for this robot and how the program looks like. Again, we are using Scratch Word blocks for this robot and we are programming the LEGO Education SPIKE prime robot. Initially, we have the program on the left and we have the video recording of the robot and how it works. On the right, we started the program with a block that's called "when the program starts". So when the program starts and the moment that the program starts is the moment at which we press the bottom right here. When we click the program will start. After the program starts, we set a movement Motors to A and B. This LEGO Education SPIKE Prime robot. It has four Motors. Two of them are responsible for driving the robot and two of them are responsible for different attachments. We use A and B as the two Motors with which we are driving. And you can see that you can use this block right here from the left, from the palette, and you can place this block in your program. Now, I'm not going to do this because the program is already developed for you so that you can download it and directly run it on your robot. After we start the robot and after we press the button, the robot moves forward and it will move forward for about 30 CM. That's it. That's the job of the second block, second purple block, it's move forward for 30 CM. Then turn left for 8 CM and then move forward for 55 CM and that's a simple program and as you saw in the first part of the tutorial it is not very easy to have a consistent robot behavior with this program. Why? I'll show this in a minute when we first start with the robot you can see that we start from this position and if we now go a little bit further we are telling the robot to move forward but initially as it moves one of the wheels it slips on the mat and the robot moves slightly to the right. Why? It's a balanced robot, but probably one of the Motors is not that powerful as the other. Probably one of the wheels has more traction than the other. There are always different reasons. Even when you start the robot just starting the robot you start from a position at which you are aligned and then you start the robot and the robot makes a mistake. It goes slightly to the right and your robot will behave in a different way. It might go slightly to the left. The important thing is that we currently demonstrate how we move with the robot and my basic point here is that using just the blocks for moving with the robot are not going to help you develop a robot that behaves in a consistent way at a certain point and we'll get this into the course we have to use sensors initially as the first program. It's okay for us to start. We just move forward turn left and then move forward again. Go on download the program show the buildings for the robot after you load the building for the robot download the program on the robot and experiment with this program and see how precise the robot behavior is and see you in the next thorough.
Курсове и занятия включващи този Урок
Този Урок е използван в следните курсове и занятия.
LEGO Education SPIKE Prime Programming for Competitions with Word Blocks
Two fundamental concepts are essential for robotics competitions: ensuring the robot consistently navigates and positions itself accurately on the field and designing attachments that complete missions once the robot reaches its target. This course focuses on the first aspect - precise navigation and positioning - while the second is covered across the entire FLLCasts platform, starting with the FIRST LEGO League with LEGO Education SPIKE Prime. "Challenge" competition for 9-16 years old
The goal of this course is to help you learn how to program LEGO Education SPIKE Prime robots to operate consistently and reliably in competition settings. We use LEGO Education SPIKE App Word Blocks, a Scratch-based programming language, to teach key techniques applicable to FIRST LEGO League and World Robot Olympiad competitions. Topics covered include different methods for line following, such as fast, slow, smooth, and using multiple states, as well as techniques for line alignment, double alignment, and maintaining a straight path using the motion sensor.
- 40
- 188:21
- 19

Moving on the field without sensors
In this video tutorial we start with the basic of the basic, eg. how to move. We use the block from LEGO Education SPIKE Prime Word Blocks software. It is based on Scratch. The goal of the tutorial is to demonstrate how we can move and to teach something very important - the robot moves inaccurately
- 2
- 0
- 1
- 3d_rotation 1