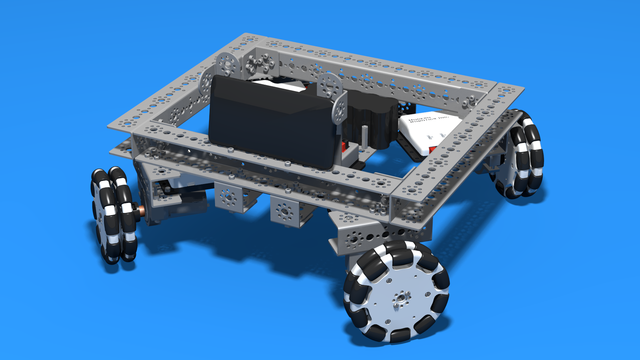
Rubber band LEGO attachment without motors
Building instructions for the Rubber Band Attachment
- #188
- 28 Jun 2015
- 1
Building instructions for the Rubber Band Attachment
These are building instructions for one of the greatest LEGO Mindstorms attachments that we've built. Super simple and easy to follow and at the end, you have an attachment with a rubber band that controls a lever and that could lift objects from the field. It could lift them up. Also because it is with a rubber band you don't need a motor and you could use the motor for other attachments.
- note that I have added two angled beams and an axle to illustrate how you could use the slide as an active attachmen;
Advanced LEGO MINDSTORMS EV3 Construction. It has two rear motors and it could rotate the whole from part. It has 4 wheels and is kind of like unique in the Mindstorms world.
Building instructions are not very easy and you need LEGO Education Core and Extension Sets - 45544 and 45560.
Apart from being advanced, it is also quite fun to try to build.
- note that you could attach it to the brick both sides, depending on which technique you would like to test. Use the video as a reference.
- you should attach it to the motor, depending on the orientation of the motor.
- you should attach it to the motor, depending on the orientation of the motor
This LEGO attachment connects a LEGO Mindstorms EV3 Motor with a LEGO Technic Linear Actuator. The connection is through a couple of gears which makes the whole instructions quite interesting and useful as an example.
The attachment was used during FIRST LEGO League 2014 Robotics competition.
Building instructions for this part of the BigDaddy competition robot
You can position the motors on the construction in a number of different ways. We are exploring the advantages and disadvantages of each of them. These are building instructions for the first way to position the LEGO Mindstorms EV3 motors.
This construction uses a differential. Both wheels could turn with different speed and this makes a construction much more stable when turning.
Third part of the LEGO Mindstorms BidDaddy Competition Robot.
We've separated the BigDaddy robot into a few smaller modules. This teaches modularity and gives you the option to reuse some of the modules and to look at specific modules.
You can attach a frame around the front wheels to make them more stable and to allow for better aligning. The module extends the front wheel built at BigDaddy Front - front wheels mechanism module for a large LEGO Mindstorms Competition Robot
This frame holds the motor and ev3 brick used in the catapult. The frame is placed on top of the rotating base and thus could be easily rotated. The brick could be both NXT and EV3
This is the initial construction of a catapult. The base on which we will place the rest of the robot. The goal of this construction is to give the catapult the ability to rotate.