

Teacher's Notes: Intro Yo-Yo challenge
A note why we give the challenge at the start of the lesson.
- #374
- 04 Feb 2017
A note why we give the challenge at the start of the lesson.
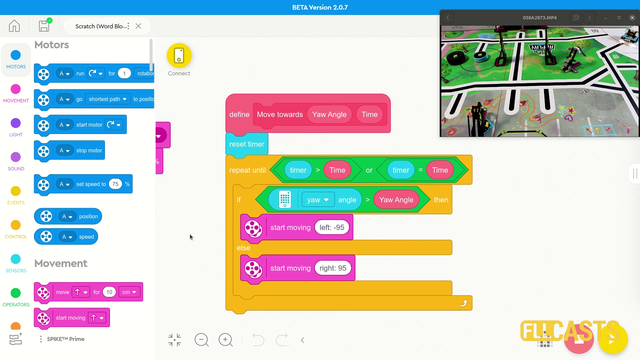
In this video tutorial we use the LEGO Education SPIKE Prime Motion Sensor to reach a mission model on the field. It's a basic use of the motion sensor that we will extend in the next few tutorials and in the same time we take the opportunity to demonstrate what a MyBlock is and how to develop one. As a result of this video you will learn how to make the program easier to read and maintain by organizing the blocks in the program in special MyBlocks that couple them all together.

The important task before the solution. If you haven't done it already, then attach a new axle at the front of the robot and extend the construction with gear wheels and axles to reach the two legs at the two sides of the robot.

In episode 11 we looked at one of the most important topics for the competition - calibrating the light sensors. In this video I would like to show you how to use a more programmatic approach. This means letting the robot do the calibration on its own. Automatically.

One of the easiest ways to improve the accuracy of LEGO Education SPIKE Prime robots is to use acceleration and deceleration when moving. This also applies to LEGO Mindstorms EV3 and LEGO Mindstorms Robot Inventor and generally to most robots that we know of. This tutorial demonstrates how acceleration and deceleration could be used and what improvement in accuracy and consistency you could expect. This is quite useful for FIRST LEGO League and other robotics competitions.

You have the controller, you have the diode. The controller has a number of pins (holes). Where should you put the diode so that it starts blinking?
The small holes on the controller are called pins. On our controller we have 32 pins. The more pins that you have, the more elements you can controller with this microcontroller. For this video the interesting pins and 13 and GND

In this video tutorial we start with the basic of the basic, eg. how to move. We use the block from LEGO Education SPIKE Prime Word Blocks software. It is based on Scratch. The goal of the tutorial is to demonstrate how we can move and to teach something very important - the robot moves inaccurately

In this episode I will show you how to program the touch sensor part of the LEGO Mindstorms education robotics sets. I have given answers to questions like - how the touch sensor works or how you can use it.
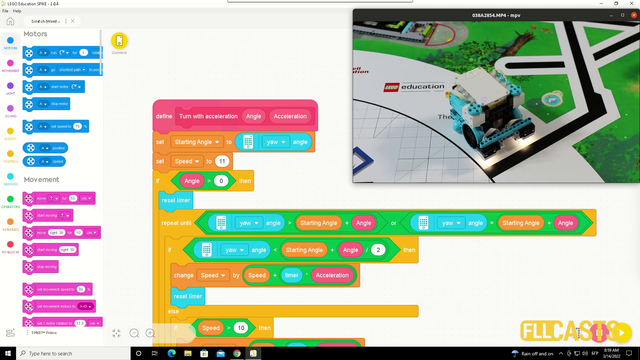
In this video tutorial we explore acceleration and deceleration and how to make the robot turn precisely by using acceleration and deceleration. The goal is for us to demonstrate a program that turns the robot to 90 degree. In the first 45 the robot is accelerating and in the second 45 it is decelerating.

In this course, you will learn how to program the game "Keep 'em clean". This is a game where the player controls a number of "people" on the screen using movements detected by a camera.

As an exercise try to implement the calibration of the minimum and maximum values for a single sensor.

Robots could do chores for us and they must consider the load of the cargo or the robot could be damaged.

On the topic of following lines with a robot there is a way to make the robot follow the line a little more precisely. This method is called "Multi-states" program. Or at least we call it like this. In this tutorial you will see how we program 5 state for the robot line following program. This could be particularly important with FIRST LEGO League competitions where we must build consistent and reliable robots.

Implement the program for array initialization.
Follow the video tutorials for initializing arrays and implement the program.

We encourage you to explore the software on your own.

Sometimes the answer that you get by calculating seems not to be right. Is it the calculation that is wrong. Probably it is not the calculation, but something is happening with the robot.

Let's make a competition - there is a pole that the robot must turn around and return home.
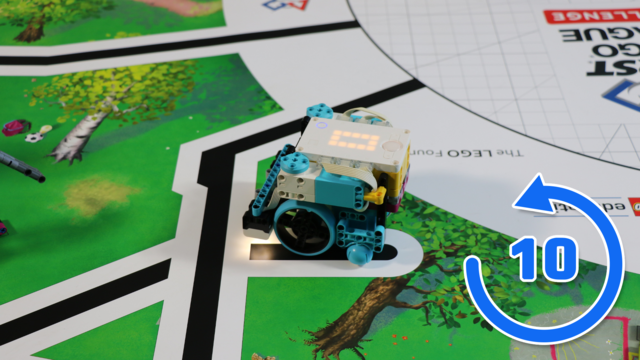
This LEGO Education SPIKE Prime video tutorial demonstrates the difference in turning slow and turning fast and using the Motion sensor to understand the orientation of the robot. We do 10 consecutive runs. The goal is to understand what can you expect from the robot behavior in terms of consistency.

Our next robot is called CastorBot, because of the castor ball.

In this video tutorial the Chain Monster box robot accomplishes a mission that requires two actions. We should lift up (lever) and push almost at the same time on the mission model for it to release the batteries. These mission model is from the FIRST LEGO League 2022-2023 SUPER POWERED competition.

The task in this tutorial is to execute the program 10 times and to do it yourself. If you have your attachment then use it. If you have our attachment then use it. But execute the program 10 times and make sure that it works.

We will take a look at the EV3 motors and will go into details about them

Sometimes a good teacher needs a few tricks in his sleeve, so that he can surprise and entertain his students.

Let's put everything that we have learned so far into practice. Let's make a spy robot!

We will demonstrate with a robot what the acceleration is and the effects of high and low acceleration.

This video tutorial shows how the LEGO Mindstorms EV3 Handlebar Chopper Motorcycle robot works. See how fast it is.
