We would start connecting a lot of things to the Raspberry Pi. It will be good if we could have some way of referring to the pins on the Raspberry Pi. For example like Pin 5 or Pin 26. Luckily there is such a way.
- #751
- 23 Feb 2018
- 1:31
TL. DR.
The Raspberry Pi has the following layout with the names of the number of the pins and what each pin is.
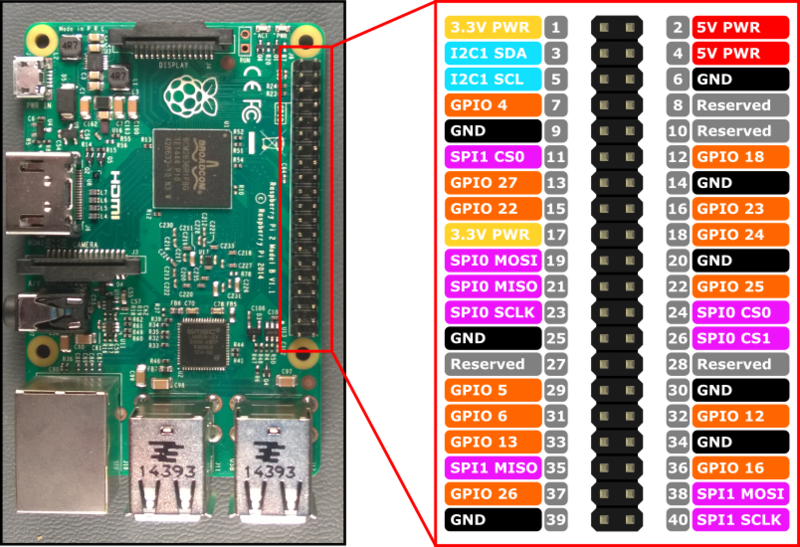
Picture credit: https://github.com/DotNetToscana/IoTHelpers/wiki/Raspberry-Pi-2-and-3-Pinout
What is the meaning of this layout?
Looking on the Raspberry Pi from above when it is positioned like on the picture you have two columns of pins. Pins on the left and pins on the rights. Those on the left have odd numbers, those on the right have even numbers.
GND
There are pins that are marked as GND. This is the Ground. It is the "-" (minus). When we are referring to minus in this course we mean the GND. How many GND pins can you count?
5V PWR
There is a Voltage Power of 5V on this pin. This is a "+" (plus). There will be voltage on this pin. When we connect one end of a Diode to 5V and the other end to GND and there is a resistor to limit the amount of current than the diode will turn on. Of course, you should have the legs of the diode correctly connected. Minus to Minus and Plus to Plus.
3.3V PWR
We might want to use a Voltage of 3.3V in certain situations. This is less than 5V. We might look at some examples later.
GPIO X
These are the pins that we could later control in our program
Other pins
There are also other pins. You could go on the internet and research what are they for, but for now, we would use just the above types pins and we don't need more.
English
We would start connecting a lot of things to the Raspberry Pi. It will be good if we could have some way of referring to the pins on the Raspberry Pi. These here are called the pins. And you can see that there are about 40 of them. And if we know their numbers like pin 5 or pin 26 and their locations, it will be much easier for us. Luckily there is such a way. It will of course be mostly inconvenient to now name each of the pins because nobody would even remember them. That's way in the tutorial we've attached a picture with the layouts of the pins each number of the pins and how we refer to them. What you should understand and what I should add more is that there are different kinds of pins. For example, we have 5 voltages, 3 voltages. We have GPIO pins, we have grounds and these are all things that we're gonna enter into more details. What you should do now is to go to the tutorial and check out the picture with the layout and what is each pin - at least to have a basic understanding where are the 5 volts, where are the 3 volts, where is the ground, where are the different GPIO pins.
Courses and lessons with this Tutorial
This Tutorial is used in the following courses and lessons
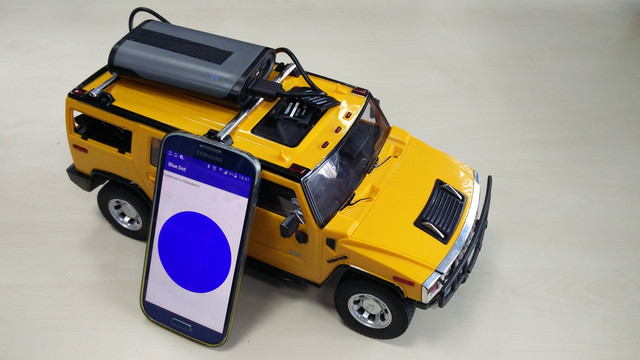
Perfect STEM course. Module 1 - Smart Car with Raspberry PI
Disassemble a remote control car. Change the brain of the car with a smart computer like Raspberry Pi. Build a smart device with artificial intelligence that you could control from your phone and that could freely navigate itself in the real world and on the Internet. Use your hands. Develop programs for your robot and your phone. Be curious and invent.
The perfect course lives up to its name. You move through the content, we check it and return feedback to you.
In the end, you should be able to better understand how to program and design smart devices that would make the world a better place. For everybody age 12+, 16+, 21+, 35+, etc. The hardware costs about 150$. It changes through the years so it might take some time for you to find it as Raspberry PI, motor drivers, power banks and h-bridges.. they change. Note that the course was designed to be led by a teacher with a decent knowledge in embedded hardware and software. This, on the other hand should not stop you, if you are curious.
- 118
- 42:47
- 136

Connecting Car Lights to Raspberry Pi controller
We would start connecting a lot of things to the Raspberry Pi. It will be good if we could have some way of referring to the pins on the Raspberry Pi. For example like Pin 5 or Pin 26. Luckily there is such a way.
- 3
- 0
- 5
- 3d_rotation 0