
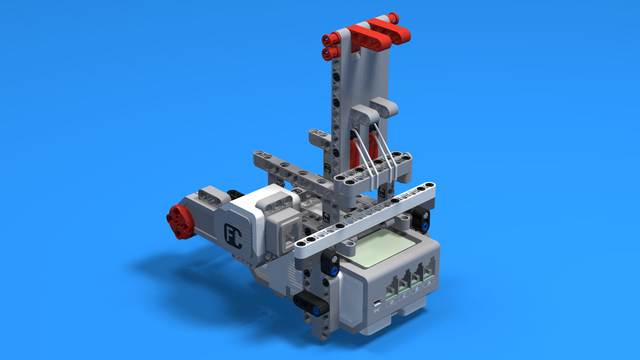
Launcher, built with LEGO WeDo 2.0
These are building instructions for the Lauchner, built with LEGO WeDo 2.0
- #768
- 15 Jun 2019
They throw, they fire, they shoot. This is a category of robots that make an object fly through space and of course through time (because of the special theory of relativity, of course). These are Shooting robots. Try them. How far could you shoot a ball for example?

These are building instructions for the Lauchner, built with LEGO WeDo 2.0

These are building instructions for a Launcher Gate. The gate is used in connection with the LEGO WeDo 2.0 lauchner that lauches objects.

Do you have a friend for a sleepover? This might be the perfect robot for you! It is a football gate, guarded by Fint, the goalkeeper robot. You can control him, by using the remote controller, that consists of two Touch Sensors. Take turns making penalty shots and have a blast with this awesome robot!
What we recommend:

These are building instruction for a working automatic catapult with a motor and a touch sensor.

Building instructions for the LEGO Mindstorms EV3 Catapult. The robot has a motor, a clutch to control it for manual shooting and a touch sensor for automatic loading. The bottom base is removed which means the Catapult could not be turned around. Nevertheless, the baseless robot is small enough to be built in class.

This video lesson shows a very interesting specific example on how to use the LEGO Mindstorms EV3 Ultrasonic Sensor. The sensor detects if the catapult is loaded or if we have just fired an element. At the end of the lesson I also offer an interesting challenge that you could use in your classroom or at home.

Vision is still one of the very few fields where a human being could outsmart a computer. Still. Colour/Light sensors are the cornerstones of implementing a smart LEGO Mindstorms robot that could at least partially do "vision". In this video tutorial, we are using the robotics sensor to detect loading and unloading of the catapult.

We just had some enormous amount of fun with building and using a catapult/trebuchet. Yes they are quite different, but the result achieved in the lesson is something in the middle. Learn how to fire elements using the LEGO Mindstorms EV3 or NXT robotics set. Challange yourself, your team or your students to build it and fire elements as far and as accurate as possible.

Building instruction for both EV3 and NXT. The whole catapult is build in exactly 78 steps.

In this video tutorial we experiment with different ways of solving the sports mission for throwing the ball. We show seven different LEGO MIndstorms EV3 and NXT robot constructions and attachements. Most of the techniques could be applied for any mission involving throwing a ball or an object.

Sometimes you could just throw a ball from base and solve a competition. Or at least many teams think so. In this video we would explore a very simple attachment for throwing balls from base. Can you use this for other missions? - we think so. Check out the video.

The Department of "throwing" is ruled by rubber bands. Impulsive power release in a short amount of time. In this video we are building an attachment that throws a ball and accomplishes the FIRST LEGO League 2012 bowling competition.
Building instructions for the catapult that could be placed over the LEGO Mindstorms EV3 Brick. The idea of the catapult it to throw objects. The fact that it is over the brick makes it very convenient to place the motors below the brick and to use the Catapult.
This robot construction itself was used in the FIRST LEGO League Senior Solutions competition

This frame holds the motor and ev3 brick used in the catapult. The frame is placed on top of the rotating base and thus could be easily rotated. The brick could be both NXT and EV3

Part three of the Catapult series is about loading the catapult automatically. We use a gear system with a medium complexity along with a very interesting "clutch" developed with parts entirely from the LEGO Mindstorms NXT kits. As a result, at the end of the video, the Catapult automatically loads and fires.

Part four of the Catapult series is again about loading the catapult automatically but this time using EV3 brick, motor and sensor. We use a gear system with a medium complexity along with a "standard clutch" available in the LEGO Mindstorms EV3 kits. As a result, at the end of the video, the Catapult loads and fires automatically.

In this second video lesson on catapults we improve the stability of the base of the robot. An important feature of the new base is that it is not bending. Use the same principle in all of your constructions to achieve better, stronger robots.

Building instructions for a LEGO Mindstorms Catapult Motor and Touch Sensor that are used for triggers for firing objects
NXT-G program for running the Catapult robot build from the LEGO Mindstorms NXT robotics set
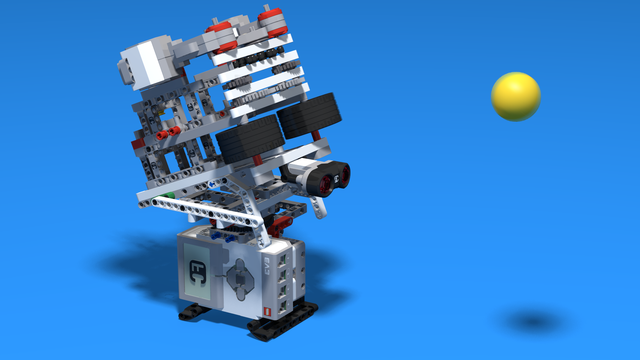
Building instructions for a LEGO robot that shoots 40 mm ping pong balls. The shooting mechanism is powered by two EV3 Large motors, while the whole mechanism is rotated by a medium motor. The robot can store up to 6 ping pong balls and has a Ultrasonic Sensor to detect targets.
