
How to build a 3D LEGO Mindstorms Model using LDraw (part 2)
In the first part we built our first 3D LEGO model. Today we will smooth the model we have created and go through the process of creating PDF instructions for building it.
- #44
- 01 Nov 2013
In the first part we built our first 3D LEGO model. Today we will smooth the model we have created and go through the process of creating PDF instructions for building it.


A clutch is a mechanical device that is used for engaging or disengaging power transmission. Now we will see how we can make such a device using LEGO.

You could use the LEGO Steel Balls as a third wheel on the robot. It is a caster wheel. But this is steel and as we know from basic existence on this planet, where there is steel there is also rust. The steel ball could get quite rusty and this could have an influence on the behaviour of the robot

This video tutorial demonstrated the use of an active gear attachment for catching a wheel and pulling it. This is how we accomplish the Rowing Mission from the FIRST LEGO League 2021 competition. What you will learn is how such an attachment works. How you transfer power from the top of the robot where the motors are to the bottom of the robot where the catching mechanism is. Check out the building instructions for the attachment.

This is a 10 out of 10 tutorial demonstrating the accuracy of an active gear attachment that accomplishes the Treadmill mission from the FIRST LEGO League 2020 RePlay competition. When the robot is well aligned to the line before that it is easy for the robot to accomplish the mission. You will see how we make use of the friction of the wheel to rotate the mission model.
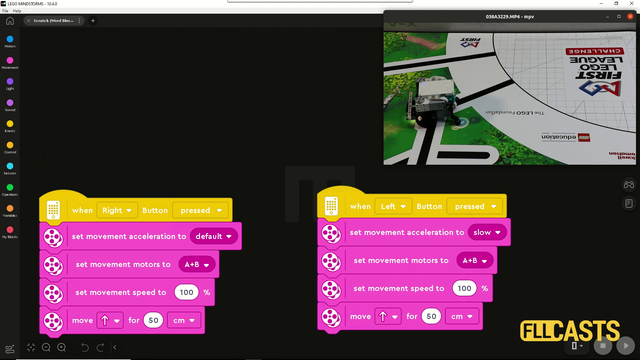
In this video tutorial we are demonstrating the impact of slow and fast acceleration on the robot. In the Scratch program there is an acceleration block for fast and slow acceleration. The robot behaves in different way. Let's explore them so that you know what to use for FIRST LEGO League competitions.

In part one we build an attachment that uses a rubber band to solve a competition challenge. The rubber band was released with the use of a motor. In this video we are removing the dependency on the motor and you could use the motor for other missions.

Have you even tried to move the robot not in rotations or degrees or seconds, but in metres. In this episode I am building a new block that could be used to move the robot a specific number of millimetres (mm). You could directly download and use it in your programs.

In a competition environment like the FIRST LEGO League (FLL) or World Robotics Olympiad (WRO) the color sensor is more than useful. It makes positioning on the field quite easy and precise.

“Doing the same with less” can save time and space.
We start with the first mission - trying to build attachments that are small and tidy and the Gazon robot allows us to do so. With a few pictures you can see how the robot should be placed along with all the attachments

Tasks on using the LEGO EV3 Mindstorms Color sensor. Quite fun and useful for different STEM classes or just to get to know the sensor.

We are showing the first way we could position the motors on the robot construction. This seems to be challenging for many robot builders and that's why we are going to do it in a few different ways in the next few video tutorials from the series.

The LEGO EV3 Mindstorms brick can be programmed from the brick itself. The motors can be moved forward/backward and even simple programs could be implemented without even touching the EV3-G software at the computer

We will cover the names and the basic usage of the parts in our typical robot.

We will demonstrate the common mistakes students make when building a robot.