We will cover the names and the basic usage of the parts in our typical robot.
- #345
- 25 Jan 2017
- 6:22
Let's make sure we all use the same names for the same parts
Names for Pins
- black pin, double pin
- blue pin, long pin, triple pin
- blue axle pin (axle and pin transition)
- torch pin (pin with cross hole)
Names for Beams
- "5 holer" or "15 beam"
- big and small L-beams
- double angular beam
Parts for movement
- Rims (thin rim, wide rim)
- Pulleys
- Tires and Rims form Wheels
Parts for spatial rotation
- Beam with pins
- Angular beam with Pins
English
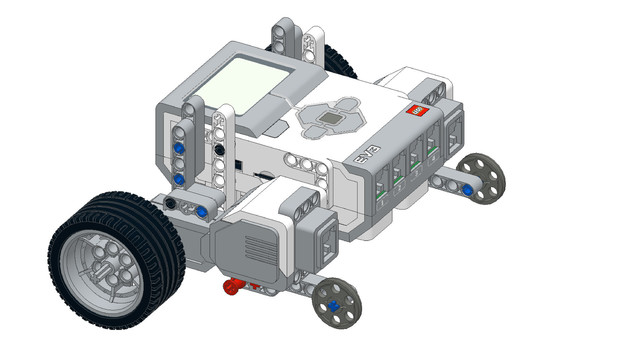
In this video we'll look at the names of some of the most common Lego parts that are used with Lego Mindstorms EV3 set.
First, let's start with the pins. There are a number of different pins in the set. First, you can see one of the most common pins. It's a black pin, also called a double pin. The idea of the pins is that you attach the pins to the beams like this. So, a pin enters into a hole of the beam. And we have a double pin. We also have a blue pin and in some of the sets you can see it again in black color. But the difference with this pin is that it's a triple pin. So, the length of this pin is three holes instead of two as was with the previous pin. So, we have the blue pin - that's a double pin. And we have the black pin - that's a double pin. And we have the blue pin - that's a triple pin. Then we also have this special blue axle pin. And if you see it in the sets you can see that one end of the pin is in one form and in the other end of the pin has a form of an axle. And it's a very useful pin for attaching to a beam to another beam where one of the holes is with an axle. And then finally the third pin that we'll use currently has a color red but I've also seen it in black, I think. Yes, in black. And we can call this and a common name for this pin is torch pin.
It has a hole and it's a cross hole. You can place different axles in this cross hole like this. And these are the four kinds of very common pins in the set. Next to the pins we also have other parts in the set that are the beams. And this here is a beam. And it has a number of holes.
This is a beam with 15 holes. We've also heard people referred to these beams like five holer because it has five holes. Or like seven holer because it has seven holes. But these are all beams. They have different color although most of the time the color is not that important with the beams. They come in light grey, in dark grey, in some red I've seen, in yellow. And these are the beams. Also there are other beams that have angles. These beams have angles. And it is sometimes referred as L beams because it looks like L. You can see it. And it has three holes by five holes. And there is also another small L beam that has two by four holes. And that's for some of the beams. We also have angler beams. We have double angler beams like this one here. And this is basically for the beams. So, these are beams and they have different holes. Some of the holes we can attach pins directly. And with other holes we can attach axles. Like this. In the EV3 set we also have rims and tires. So, we have different rims. For example, this one here, and this one here. These are two different kind of rims. And we also have tires like this. That's the tire. Now, when you add the tire to the rim, you get a wheel. Sometimes in some of the constructions, you can also use the rims as pulleys in different constructions. But that's more like a special case. Most of the time we use them just as rims and with the tires they form a wheel. The wheel has a size and you can see the size right here. So, this gives you the diameter of the wheel and from here you can do a number of calculations on how you move your robots based on the wheels that the robots use. Next, we come to two of our favorite parts in the Lego Mindstorms EV3 set. These are the parts here. First, we have this part. And it's called beam with pins because it is actually a beam and it has two holes on one side and one hole here. And we also have a number of pins - four. So four different pins. The other part is an angler beam again with pins. So it's a beam with pins. And you can use these parts along with the other beams to change the spatial orientation of the different beams. When you attach different beams to one another, most of the time you get a construction that is a plain. And to build also vertically, you must change the orientation and you can use these two parts. They are very very useful. And this is for the parts.
Courses and lessons with this Tutorial
This Tutorial is used in the following courses and lessons
EV3 Phi. Introduction to robotics with LEGO Mindstorms
The things that you will be able to do with your EV3 robot by the end of this course are:
Freely move your robot towards desired target;
Avoid obstacles on the path of your robot using sensors;
Follow lines of any shape;
Detecting and picking up objects of any kind;
- 92
- 220:20
- 36

Parts, components and notes about LEGO robot constructions
Overview of what is going to happen in module 3
- 7
- 0
- 1
- 3d_rotation 0

Instructors Remote Training
If you are working with students and you want to introduce Robotics to your class or you want to mentor a FLL team, but you are insecure about your technical knowledge in the Robotics field, then this is the right place for you. Having in mind teachers' busy schedule, we have design two different schedules and added an option to design one just for you. FLLCasts's Mindstorms EV3 Robotics Online Training is the perfect match for any teacher.
After the completion of each task the participant has to upload his solution for verification.
- 183
- 280:11
- 156
How to make the robot move
Let's review the LEGO Mindstorms EV3 Intelligent Brick
The EV3 brick is the main computer of your LEGO robot and it has a display, a few buttons and various ports.
- 24
- 0
- 11
- 3d_rotation 0

Level A1. Introduction. Robotics with LEGO
Introduction to robotics - The first level of the Robotics with LEGO curriculum for students in second, third or fourth grades. A journey in space, with robots. Various constructions with robots are built. Learn how to control the motors so that the robot navigates around the Sun, the Moon and Earth in various ways. Getting to know the first of the sensors. The robot can feel its surroundings with the help of the Touch sensor and avoid obstacles.
- 142
- 133:42
- 187

Lesson 2 - Yo-yo challenge
Introduction
Today we will learn to program the robot to perform more than just one action, as well as program it to move like a yo-yo. Have you ever played with a yo-yo? How does it move? Did you know that from Filipino yo-yo means "to return".

- 18
- 3
- 8
- 3d_rotation 1

Robotics with LEGO - Level 1.0 - Adventure in Space
The first level of the Robotics with LEGO curriculum for students in fifth to twelfth grades.
Various constructions with robots are built. Learn how to control the motors so that the robot navigates around the Moon and Earth in various ways. Getting to know the first two sensors. The robot can feel its surroundings with the help of the Touch sensor and avoid obstacles.
The Ultrasonic distance sensor can help the robot avoid obstacles. Students work with concepts like loop, degrees and medium motor. Robots can now do two different actions at the same time - while solving missions on a field, the third motor clears detected obstacles.
- 126
- 123:52
- 150
Revision of the parts' names and their place in the box
We will cover the names and the basic usage of the parts in our typical robot.
- 3
- 0
- 0
- 3d_rotation 0
Level A1 - Space Adventure - Robotics with LEGO SPIKE Prime
This is the first level of the LEGO Robotics Curriculum for second, third, and fourth-grade students.
A "space adventure" but with robots. Different robot structures are built in Level A1. The motors are controlled so that the robots perform precise movements around the "Earth", "Moon" and "Sun". We use the force sensor to overcome various obstacles we bump into. We learn interesting facts about the solar system and space vehicles.
- 65
- 30:30
- 76

Lesson 2 - Tidal waves
Introduction
Today, we will focus on an interesting effect caused by the Moon: tidal waves.
You may know that massive bodies have an attractive force - gravity. The Moon's gravity pulls the water in the oceans, which causes the sea level along the ocean coasts to temporarily rise or fall. The increased level is called high tide, and the decreased level is called low tide.
How much, do you think, can the difference between high and low tide be in the world?

The distance between high tide and low tide sea levels can reach up to 16 meters in the Bay of Fundy in Canada, and the lowest differences are in the Mediterranean, Baltic, and Black Seas, where they are only a few centimeters. We will use 50 cm as an average value as it is convenient for the task.
- 10
- 5
- 12
- 3d_rotation 1