
Robot with Front Wheels
A LEGO Mindstorms EV3 Chassis with wheels at the front. Built with the EV3 set you can use this robot chassis as a base for extending with attachments.
- #68
- 31 Jan 2016
- 1
A LEGO Mindstorms EV3 Chassis with wheels at the front. Built with the EV3 set you can use this robot chassis as a base for extending with attachments.

Building instructions for the robot build with LEGO Mindstorms EV3. It is called "Frankenstein" because the two motors are in two different directions.

This is a ping-ball containing attachment for a World Robotics Olympiad. The attachment is building with LEGO Mindstorms EV3 parts. It is tiltel so that it is easier for the balls to fall off at certain points, which was part of the missions at the 2015 cmpetition.

Building instructions for a competition robot following the "Box robot" principle. The robot is built with LEGO Mindstorms EV3 and could be used at FLL and WRO.

Building instructions for the robot used in WRO 2014. It is a small robot with two light sensors and could be used for collecting elements.
The robot is built from LEGO Mindstorms EV3 parts.

Robot for collecting ping pong balls used in the World Robotics Olympiad competitions. It is constructed with LEGO Mindstorms EV3

For World Robotics Olympiad Ball Collection competitions we prepared an interesting Robot Base Chassis that could be extended with a container. The container contains the ping-pong ball. A mechanism collects them. This LEGO Mindstorms EV3 building instructions are for the chassis of the robot and were one of the versions from a series of robots.

A robot that can be an ATM or smart lock with color code. The programs pull in and push out the color card and play sounds if the colors are in correct order. When the order is incorrect, you hear an error sound.
The robot takes place in lesson 7 of level 3.0 Security Systems.
This program is a final version of the game played with EV3 Kinesthetic and Memory Game. In this game you are given a sequence of hints which you are expected to remember and to perform the right actions in the given order.

The solution to every task in the second lesson of the 3.0 module.
The program is designed for this robot.


The goal of this lesson is to introduce students to the setting for measuring the reflected light of the color sensor and to recall how to follow a line.

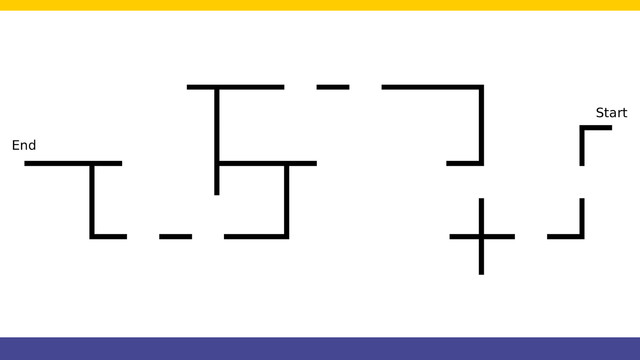
We start a course for following a line with crosses and gaps. This is a challenge that one of the users at FLLCasts.com was trying to accomplish and asked us for advice. We present the whole challenge to you step-by-step. But first, let's also see the whole run of the line following algorithm. With this course, we also do an introduction of using State Machine as a programming pattern.

Counting lines and stopping on the third is the subject of this video. It is important to know how to do this in order to conduct more than one experiment in STEM classes (if we consider that each line is an experiment)

In the first LEGO tutorial we started following a wall with the Ultrasonic Sensor. In this tutorial we would improve the program, remove the zig zag movement and make it very smooth.