In this video tutorial we show how you can build robots that position on the field consistently and reliably by following and line and then aligning to a line. We also demonstrate the concept of "double align" which is quite powerful and even if there were some mistakes they will be handled.
- #1943
- 08 Aug 2022
- 10:03
- LEGO Education SPIKE Prime
- Align, Line follow, FIRST LEGO League, Line following, Scratch, LEGO Education SPIKE App Word Blocks 2, Programming, Light and Color Sensor, Sensors, FLL
When programming LEGO Education SPIKE Prime robots we can use the Color sensors for following a line, detecting an intersection and aligning to a line. There are also other ways to use the sensors, but these are the most useful for FIRST LEGO League competitions. In the tutorial we demonstrate all of them
How to use this tutorial?
Build the robot, download the program, draw such a field with such a turn and intersection and try to implement the program
English
In this video tutorial we use LEGO Education SPIKE Prime in its two color sensors and we combine two programs in one. First we follow the line and then we align to this line.
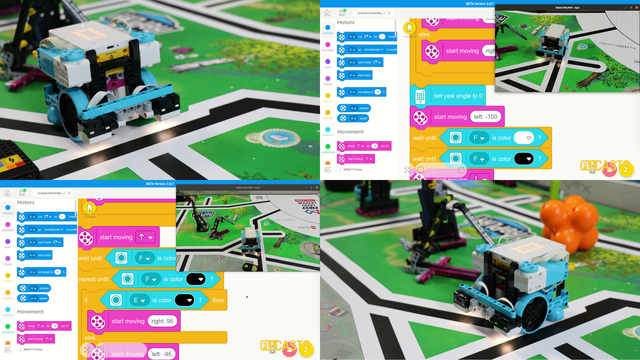
Let's see how it works. Start from base. The robot follows, the line turns and after about five, six, 7 seconds it rotates and it aligns. We combine the two programs together, the program for following a line and the program for aligning to align. And this concept is very powerful because in this way we can build much more consistent robots - follow align. Let's see one more time. It's important to start on the same place in base in our program because we rely on the timer as we follow. After a few seconds we stop, we rotate and we know where we are on the field. Let's take a look at the program. This here is the program and the program is on our left all the blocks in the scratch program. It's a rather advanced program and we will move through each of the blocks and the concepts that are in this program and we try to explain them in details. They are not complex, but they are kind of like advanced. In the same time, on the right, the recording of our robot. So first, when the program starts, we set movement motors A and B and we set the speed to 20%. It's okay for the demonstration here on this competition, you might need to have another speed, but it's something that you should experiment with your robot. Then what follows is this repeat until block. And what we want to do is we want to move with the robot until the right sensor, this one here on the right of the robot, detects this black line. So we are going to repeat something until this sensor detects a black line. Cool. And what are we going to repeat? We are repeating this if statement. This if statement is the following. It follows a line if sensor E, which is this sensor on the left of the robot, detects color black then we move slightly to the left, otherwise to the right, left, right, left. And this is how the robot will behave. We start, we follow the line with the left sensor. We follow the line with the left sensor until the robot reaches this black line right here. And then something else happens, but we will see it in the moment. What's important is that we repeat until we detect a black line. And what we repeat is the logic for following line. What happens when we reach the line? When we reach the line, we do the following thing. We start moving left with -100, which basically means move one of the motors back up the other motors forward and you turn left, moving. And after this start moving you see these two "wait until(s)" "wait until(s)" so what are these? "wait until(s)". Which is sensor F? Sensor F is this sensor right here. And what we are trying to do here is we are moving and we are aligning at the same time. We wait until sensor F, the text color white and then we wait until sensor F, the text color black. Why do we wait here? Because the moment we stopped and we detected the line sensor F was detecting black, it was over the black line. You see, we stopped here and it is over the black line when we start turning. So now we turn, we see white again with sensor F. Currently we are in this block, wait until because the right sensor is on white. We continue until sensor F is over black right here. And when the sensor F moves over black, what we'll do is start moving backwards. Here it is, we start moving backwards and the way we move back is we again use this wait until block, quite useful as a block. And what are we waiting for? We are waiting until both sensors, sensor E and sensor F, they detect color white, which is this white line right here. And this way we follow the line, then we stop, then we turn without using any degrees. Notice that there are no degrees here. We are not depending on anything connected with timers and with degrees. We are only using the sensors, which is the right way and the right way to achieve a consistent and reliable robot. We wait until both sensors see the white line,
then we stop this block here, then we stop moving and we are over white. The moment we turn back, here it is, turn back and we stop right here. We are at this "stop moving" and the next couple of blocks are really important. We need them to make sure that the robot is aligned because of the inertia, because of the way it could turn, it could slip on the field. Not "sleep" as sleep during the night, but slip on the field. And that's why we align the robot again, this time moving forward and looking at the black line. So what do we do? We set the speeds of motor A and B to 20%. We start motor A. Motor A is the left motor and we start it until the sensor E is over black. Then we stop and we start motor B, which is the right sensor. And we work with motor B until sensor F, which is the right sensor, is over black. And this happens very quickly because we are really close to the black. But we need these blocks here to make sure that we've aligned to the white. And then we move forward to align to the black. And this double aligning, it's a concept that we constantly use because it makes sure that even if there is a mistake on the first align, something has slipped on the field. During the second alignment, we remove this error. How does it work? We start with motor A, and you see how we slightly move forward with motor A. We are over black now, and we start with Motor B. We are over black now, and the robot is perfectly aligned. This concept of let's first align it to the white and then align it to the black is working every time. Now, what you should do with this tutorial, what you should do is you should download the program, you should assemble the robot, and you should try to implement the same program for the field that you have. If you have the replay field, great. If you don't have the replay field, look at one of the other fields. Or build this line yourself and build such a turn with such an intersection. And try to implement the following program, the same program, and try to use the same concept. Try to align twice. First the white, then to the black. Try to follow and try to detect. See you in the next tutorial.
Courses and lessons with this Tutorial
This Tutorial is used in the following courses and lessons
LEGO Education SPIKE Prime Programming for Competitions with Word Blocks
Two fundamental concepts are essential for robotics competitions: ensuring the robot consistently navigates and positions itself accurately on the field and designing attachments that complete missions once the robot reaches its target. This course focuses on the first aspect - precise navigation and positioning - while the second is covered across the entire FLLCasts platform, starting with the FIRST LEGO League with LEGO Education SPIKE Prime. "Challenge" competition for 9-16 years old
The goal of this course is to help you learn how to program LEGO Education SPIKE Prime robots to operate consistently and reliably in competition settings. We use LEGO Education SPIKE App Word Blocks, a Scratch-based programming language, to teach key techniques applicable to FIRST LEGO League and World Robot Olympiad competitions. Topics covered include different methods for line following, such as fast, slow, smooth, and using multiple states, as well as techniques for line alignment, double alignment, and maintaining a straight path using the motion sensor.
- 40
- 188:21
- 19

Follow and align
In this video tutorial we show how you can build robots that position on the field consistently and reliably by following and line and then aligning to a line. We also demonstrate the concept of "double align" which is quite powerful and even if there were some mistakes they will be handled.
- 2
- 0
- 1
- 3d_rotation 1