Is it better to do fast turns or slow turns? Should you save some time by turning fast or should you be more precise by turning slow. Where is the balance? This video tutorial demonstrates exactly this for LEGO Education SPIKE Prime robot, their motion sensor and an ever occurring question on FIRST LEGO League competition which is how to find the balance and where is the balance.
- #1925
- 27 May 2022
- 8:56
- LEGO Education SPIKE Prime
- Scratch, LEGO Education SPIKE App Word Blocks 2, Programming, Sensors, Gyro Sensor, Motion Sensor
Turning fast vs turning slow
When turning fast the inertia of the robot is larger and the robot turns, but it is not very precise. If you turn to 90 degrees it could turn to 95 or even 110. This makes the robot more unpredictable. To make the robot more predictable you should try to turn slowly. How slowly is a question of experimentation for the specific robot, attachment and missions, but "slowly" is more precise and consistent. The thing there is that you are loosing time. How much time could you afford to lose?
How to use this tutorial?
In the lesson of the course will find the building instructions for the LEGO Education SPIKE Prime 45678 robot along with the programs. Build the robot, download the programs and experiment for your robot. Then try to reach a mission model on the field with a program with fast turns and with slow turns.
English
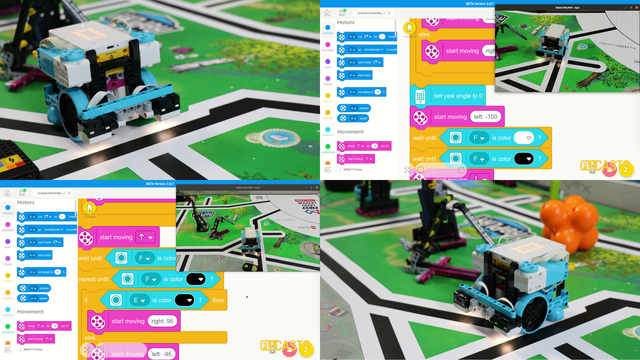
In this video tutorial for LEG Education SPIKE Prime we explore the Motion sensor and what's the difference between turning fast on 90 degrees and turning slow? And we explore the difference with the program that we've developed. Is it better to turn very fast or is it better to turn slowly to 90 degrees? This is how a fast turn and then returning looks like. Let's see this again. Turn very fast with the robot. Motion sensor detects 90 degrees and we stopped the robot. Then we turn slowly.
So let's discuss the differences. In the first version of the program we turn the robot very fast and you can see how it positions itself not exactly at 90 degrees first and return it's not exactly at 90 degrees. This tool, you can choose to use this tool or you can decide to move slowly. And if you move slowly, then you have some kind of a better precision and a more consistent behavior. The programs are quite interesting. Let's dig into them. On my left, I have the program that we developed currently on the screen. And on the right, we have the video of the road and how it behaves. And let's move slowly frame by frame, to the different stages of the program. And let's see how the robot behaves. First, we'll do two examples of how we move very fast with the robot to turn to 90 degrees and because of the inertia of the robot, because the robot is very fast, we miss 90 degrees, and then we return back and try to position the robot to 90 degrees. That's very useful as a tool that you can choose if you don't have a lot of time and you are willing to accept some kind of a risk of positioning the robot precisely. You can try to turn it very fast and then return to opposition. It's a tool. It's a tool. You can decide to use it. And we've used it in many competitions and we've seen teams that use it move very fast again and return back. How does the problem look like? First, we have the robot. The robot has motor A as a left motor, motor B as a right motor. And initially, when the button is pressed left, we move fast and return back. That's the first block, we set movement to Motors A and B, 100% as the maximum speed with which we can move to Motors with which we can rotate the Motors. We reset the angle of the motion sensor. We set the acceleration to default, which is important because we start from zero and reach 100% very fast. And we start moving and we start moving right. Why do we move right? Because we want to position the robot to the right, and we wait. We wait until the angle of the motion sensor is 85 or above 85. And as we start doing here in the moment, we are in the wait until block we are moving with the weight until moving, moving. And as we reach this is somewhere the robot detects 85 around here, around here it detects 85. But it takes some time for the robot to stop. So it is actually rotated to 110 degrees probably. Then we stop moving and we set the movement speed to 10%. We start slowly, returning back and we return back, moving to the left until the angle of the sensor is 83 or less
and reposition the robot like this. And now we can experiment with our specific robot. These values here, they could be configured. They could be configured. These are things that we can configure depending on the size of our robot, depending on the inertia of the weight of the wheels that we are using, of the tires, of the attachment. So for every robot, these values will be different. Some will be 85 or others it will be 87. For others, probably there are some robots to which we can go further down to 83. I don't know. And depending on the way the Motors are positioned, depending on the wheels and tires and many other factors, we can change the configuration of this program so that it stops at exactly 90 degrees for our robot. For our column case, it stops slightly after 90 degrees. It stops at 83 deg somewhere there and the robots are smaller. That's the first program for the motion sensor that we want to demonstrate here. The second program for the motion sensor is a much more simpler program with only one wait until and this program is activated. When we press the right button, let's move to the program right here. We position the robot and we start the program. That's it. I will turn it back. Start the program with the right button. You can see that we are pressing the right button. The robot sets movement of Motors to A and B. Set movement to 50% so it's not 100%, it's slower. We reset the angle of the motion sensor and the acceleration is very slow, not default. It's slow, not fast. It's slow because we want to have slow and precise test here to see if this will be more useful for our use case. Then we continue and we wait until angle is again 83 degrees or more than 83 deg. We wait and there is still some inertia. So 83 degrees is somewhere here and we try to stop with the Motors, but the robot skips the 90 degrees. And because of the inertia, we stop somewhere here. And now we've stopped the program. Stopped the robot again. Let's see how it would look like. Position the robot, press the right button, move and stop. So these are two tools that we think every team and every one, every team member that's programming the roads should have in their toolbox and you should make a balanced decision. Do you want to go fast or you are okay to be slightly slower but more precise. Different robots they'll probably get different results with different programs so experiment now with both programs. Download both of these programs so it's one program so download this program to your robot and try to experiment with your robot. It will teach you first how to wait for turning left and right pressing the left button and the right button but more importantly how to do some basic motion sensor checks and try to position the robot in a direct consistent way.
Courses and lessons with this Tutorial
This Tutorial is used in the following courses and lessons
LEGO Education SPIKE Prime Programming for Competitions with Word Blocks
Two fundamental concepts are essential for robotics competitions: ensuring the robot consistently navigates and positions itself accurately on the field and designing attachments that complete missions once the robot reaches its target. This course focuses on the first aspect - precise navigation and positioning - while the second is covered across the entire FLLCasts platform, starting with the FIRST LEGO League with LEGO Education SPIKE Prime. "Challenge" competition for 9-16 years old
The goal of this course is to help you learn how to program LEGO Education SPIKE Prime robots to operate consistently and reliably in competition settings. We use LEGO Education SPIKE App Word Blocks, a Scratch-based programming language, to teach key techniques applicable to FIRST LEGO League and World Robot Olympiad competitions. Topics covered include different methods for line following, such as fast, slow, smooth, and using multiple states, as well as techniques for line alignment, double alignment, and maintaining a straight path using the motion sensor.
- 40
- 188:21
- 19
Motion Sensor - fast turn
Is it better to do fast turns or slow turns? Should you save some time by turning fast or should you be more precise by turning slow. Where is the balance? This video tutorial demonstrates exactly this for LEGO Education SPIKE Prime robot, their motion sensor and an ever occurring question on FIRST LEGO League competition which is how to find the balance and where is the balance.
- 2
- 0
- 1
- 3d_rotation 1