This is the first, but not the last video tutorial of the course where we reach a specific mission model in a consistent way. We use the Motion sensor and only some basic principles like turning to an angle. If we use the principles in this tutorial and then build an attachment for the mission model we will have a pretty consistent way of accomplishing the FIRST LEGO League mission
- #1923
- 24 May 2022
- 6:28
- LEGO Education SPIKE Prime
- Move straight, Scratch, LEGO Education SPIKE App Word Blocks 2, Programming
In the tutorial we describe the programming and the use of the Yaw value of the Motion sensor
English
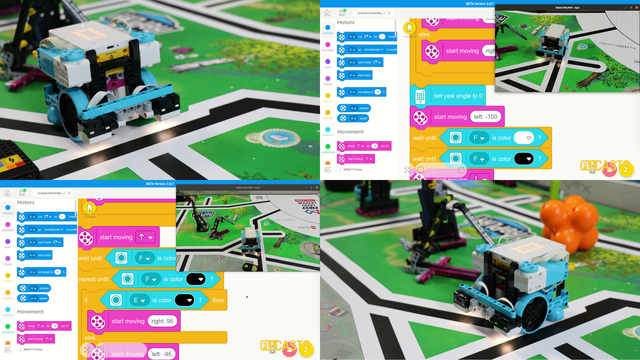
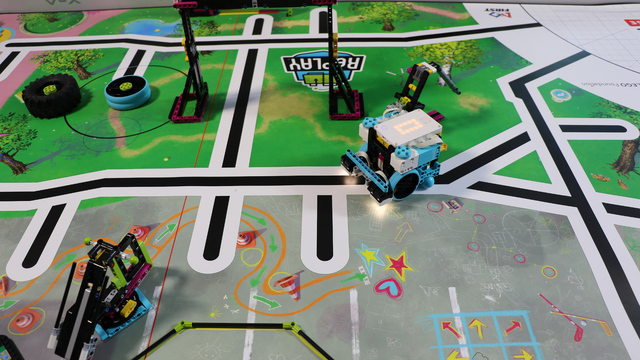
In this video tutorial for LEGO Education SPIKE Prime robots, we'll explore the Motion sensor and we'll try to reach a specific position on the field. We start from base and we want to reach this mission model in the lower left, bottom left corner. Let's start from the base and let's see how our program works. We align the robot at the start, we'll be using the Motion sensor and for the motion sensor we use the motion sensor only for the parts where the robot rotates. As you can see, we reached the mission and we were quite precise. We went exactly where we want to go. We explore the program and we run the robot a few more times.
Start again,
move forward, turn left, move, turn, move. We'll also do a ten runs video to demonstrate the consistency. But let's look at the program here. On my left, on the screen we have the program for the robot and on the right we have the video recording of how the robot behaves when we move forward with the robot. We will explain how each of the blocks works in the program. First we are at the base and we initialize the Motors A and B. The left motor is A. The right motor is B. We initialize them and we set that they move with 50%. Then the acceleration is slow, we want to be more precise. Slower acceleration means more consistent movement. And then we set the angle of the motion sensor to zero and we move forward. It's a very simple, straightforward program that you can use to position the robot basically anywhere on the field with good consistency. It's not the best one, but it's very good. Let's start moving, Move forward work or about 30 CM
than we turn with the Motors and we detect the Yaw angle of the Motion sensor and if the angle is equal to -50 or it's less than -50 degrees, we stop. So this here is the process in which we turn while we are turning weird in the wait until we started moving and at the end, after the motion sensor detects about something larger than -50 degrees, we stopped moving. Then we continue move forward for about 30 CM. We start turning to the other side. We turn right and we start turning right until the yaw sensor, the Motion sensor detects an angle of more than 30 degrees equal to or more than 30 degrees.
And these 30 degrees are relative to the position where we start. And you remember that we started right there up in the top right corner and the current position of the road compared to the initial start is at about 30 deg. And that's the thing about the sensor. We don't reset the sensor while we are moving - we can. There are other programs in which we do this, but this program, we don't reset the sensor. We move forward for about 80 CM.
We stop and return left. We are now in start moving left block, remove left and move left until the sensor detects something that's -45 or less compared to the initial position where the robot started. As we reach the angle, we stop and we move forward for about 15. This is how we reach the mission model exactly. We are about like two or 3 CM from the mission model and now we can accomplish the mission if we have the attachment and we have other courses in which we describe how we can build attachments for each of the missions. I suggest that you go and check them out if we have a good attachment for the mission model, we've reached the mission model and now we can accomplish the mission model. It's a simple program. It's a simple program that just moves forward with the robot and uses the motion sensor only during the turns. We'll do ten runs in the next tutorial, the same lesson in the course where we will demonstrate what will happen and how consistent will this robot be if we decide to run it ten consecutive times and this will give us good understanding of how consistent this program is. See you in the next video. Bye.
Courses and lessons with this Tutorial
This Tutorial is used in the following courses and lessons
LEGO Education SPIKE Prime Programming for Competitions with Word Blocks
Two fundamental concepts are essential for robotics competitions: ensuring the robot consistently navigates and positions itself accurately on the field and designing attachments that complete missions once the robot reaches its target. This course focuses on the first aspect - precise navigation and positioning - while the second is covered across the entire FLLCasts platform, starting with the FIRST LEGO League with LEGO Education SPIKE Prime. "Challenge" competition for 9-16 years old
The goal of this course is to help you learn how to program LEGO Education SPIKE Prime robots to operate consistently and reliably in competition settings. We use LEGO Education SPIKE App Word Blocks, a Scratch-based programming language, to teach key techniques applicable to FIRST LEGO League and World Robot Olympiad competitions. Topics covered include different methods for line following, such as fast, slow, smooth, and using multiple states, as well as techniques for line alignment, double alignment, and maintaining a straight path using the motion sensor.
- 40
- 188:21
- 19
Motion Sensor - Accurately reach a mission model with basic programs
This is the first, but not the last video tutorial of the course where we reach a specific mission model in a consistent way. We use the Motion sensor and only some basic principles like turning to an angle. If we use the principles in this tutorial and then build an attachment for the mission model we will have a pretty consistent way of accomplishing the FIRST LEGO League mission
- 2
- 0
- 1
- 3d_rotation 1