Using a number of axles, beams and rubber bands we collect many loops at once. This is an important part of every competition, mostly of the FIRST LEGO League.
- #171
- 25 Nov 2015
- 9:43
- LEGO MINDSTORMS, LEGO MINDSTORMS EV3
- FIRST LEGO League, FIRST LEGO League 2013-2014 Nature's Fury, Attachments, Rubber band, EV3, FLL 2013, FLL, Construction
Previous episode:
-
Multiple rubber bands attachment for Solving-FLL-Nature's-Fury. Part 1
-
Multiple rubber bands attachment for Solving-FLL-Nature's-Fury. Part 2

English
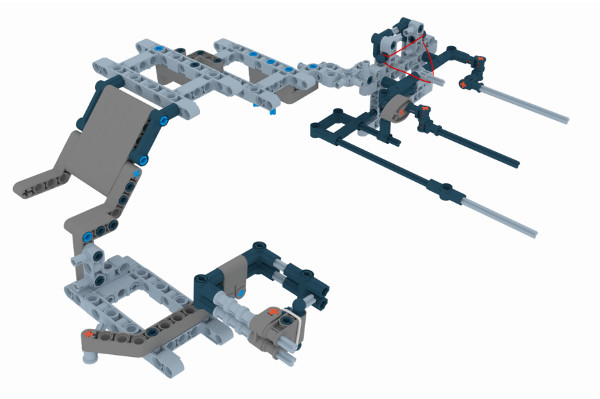
In this tutorial we'll build an attachment that looks like this. It is a rubber band attachment and we'll use this attachment to accomplish four of the missions of the FIRST LEGO League (FLL) Nature's Fury competition.
This missions were quite challenging because I haven't seen many teams that can solve all the missions with a single attachment at once. Most of the teams were going to this part of the field. These four missions were positioned in the north-west corner of the field and they were going to this region of the field and they were doing some of the missions and then they were returning and going back and this took a lot of time. Now we're trying to accomplish this mission with a single attachment. For this we would use the EV3 competition robot and you can find the instructions for this robot below the video. The goal of the missions was to: first, take the cat back to base, it's a loop. Take the dog back to base, take the human back to base and just notice that the dog and the cat are in our case vertically and the human is horizontally. We have the tree, we must shake it, so that this part of the tree falls and it must fall on the matt. These here are electric cables, we can imagine that these are electric cables and the tree must not hit the cables. These were the four missions. So we must do something with the tree, so that the whole part from here falls on the ground. These were the missions. Before we continue with the missions, we need to do a small modification to our robot and we would like to build a pinless attachment or the pins in the attachment must be added to these whole here or somewhere here, but in this case, notice that the beams that are here are quite long, so I'll just remove them, 2 of them, and I'll add beams that are shorter, so that I could have more space for the attachment. I remove these 2 beams and I add beams that are shorter. This one is with 11 holes, and then we add this one here.
And now we must also attach them with 2 pins, I'll take these pins and I'll add them, where can I add them, I have some space here.
So I have the robot and it has shorter beams at the front of the robot and this will allow me to have one more hole here that's actually not existing. I could use the whole attachment and I'll attach it, like this. Again as in the previous videos, it's a pinless attachment, it uses axles. Let me just show you the extension. The attachment is actually this. This is an extension and this extension uses 2 axles and with these 2 axles you can choose at which holes to add the attachment as a pinless attachment. If the holes are positioned in a different way you can change, you can, for example, reverse. Let me show you how.
When the extension is like this, you have 5 holes between the 2 axles, but you can also change and make the whole extension shorter. Add an axle right here and you have 3 holes between the 2 axles. So it depends on the robot. But it's a nice way to extend your robot, so that you can add different pinless attachments. In our case we need a distance of about 5 holes, so we'll use it in this way. I add the extension and this here is the extension. Now we have the whole attachment and with this attachment we can accomplish the mission. How does the attachment work. There are no more motors involved in this attachment, so we don't need any power from the motor, it's entirely on rubber bands and we use these 2 axles to collect the dog and the cat. And we, of course, configure the distance between these axles, where do you want them and then we move, we move with the robot and we take the dog and the cat. Then we continue moving and as we continue we have this axle here and when we push on this axle, then we lift the whole front part of the attachment and we collect the dog and the cat. We push this axle in the border. the position on the field was, like this, the dog and the cat were in the north-west corner of the field. And we also have the other mission models. And we had the human.
They're something like this. Now we move with the robot, we collect with these 2 axles here, we collect the dog and we collect the cat.
Then we continue moving and the border is somewhere here. Then we continue and we see the human and we have this small carabiner here, with a rubber band and this here is the border.
Then we continue moving and we push on the border and we take the human. You can see it in the lower corner. I'll repeat it again. Then we continue moving and we also lift, the whole attachment and then we do a small shake so that the part of the tree falls, it was like this. We shake and it must fall.
Not the whole tree, but when the tree is attached to the field this part of the tree falls on the matt. Then we return back to base with the collected loops. Again let's see this step by step. We have the attachment, it's a pinless attachment, we just add it to the robot and it's quite fast, that's it. Then we move, because the attachment is loaded, we move with the robot, we reach the dog, we take the dog with the attachment, we can move this axle lower or higher and then we take the cat.
Then we continue moving and at certain point, we reach the border and when we reach the border, we push on this axle, we release the lever here, that's held by the rubber band and the whole attachment, lift the front part. Then we continue and this here is the human, we continue moving, this here is again the border. We move with the attachment and we take the human and then we return back to base. So we collect everything and we return back to base. Again I doubt that you can use this attachment for solving similar missions, but you can use the principle in this attachment, for example, the lever for lifting part of the loops, when pushing on the border and the rubber band that's locking the carabiner here, for collecting different loops on the field. These are the 2 important parts in our attachment.
Courses and lessons with this Tutorial
This Tutorial is used in the following courses and lessons
FIRST LEGO League Competition. Attachments
This course is a collection of materials for many of the attachments that we've built at FLLCasts before introducing courses. The videos were built as separate different attachments for different competitions and with the following course, we try to give it a structure.
- 60
- 347:26
- 0

Attachments with Rubber Bands
Let's try to integrate more of the things we have learned into a single attachment. One that could accumulate energy, conserve it and use it at the appropriate time. All this because of a Rubber Band and a Flywheel - and if you don't know what a flywheel is you should definitely watch this videos
- 12
- 0
- 0
- 3d_rotation 9

FIRST LEGO League (FLL) 2013 Nature's fury. Review of solutions with explanations
These are a couple of structured examples and tutorials of how the missions for FIRST LEGO League (FLL) 2013 Nature's Fury competition could be accomplished. We've gathered recordings and explanations from which students and teacher can learn a lot. There are rubber bands, lifting attachments and a lot of trucks that we are pulling and pushing at this robotics competition.
- 10
- 79:11
- 0

Multiple rubber bands attachment
Accomplishing many tasks with a single attachment for the FIRST LEGO League (FLL) 2013 competition. The attachments are using many rubber bands. What is interesting is that it collects/lift/triggers many things at the same time. This is how you could save time and parts during a competition.
- 3
- 0
- 0
- 3d_rotation 3