With this series of videos we are looking at FIRST LEGO League 2013 Nature's Fury competition and we are building a robot for accomplishing some of the mission. It would be a tutorial with at least four parts and we are building a complex attachment that could catch, lift and release different parts with only one motor and rubber bands. Not one, not two, but three movements with only one motor.
- #109
- 27 Sep 2015
- 5:44
- LEGO MINDSTORMS, LEGO MINDSTORMS EV3
- FIRST LEGO League, FIRST LEGO League 2013-2014 Nature's Fury, Attachments, Rubber band, EV3, FLL 2013, FLL, Construction
FIRST LEGO League 2013 Nature's Fury included a truck and an ambulance missions. The goal was to move the truck and the ambulance to a specific place on the competition field. This required some engineering on how exactly to move the two objects with the robot. Do you lift them, push them, pull them.
In this video tutorials we are using a robot with an active attachment that lifts the mission models.
The attachment will use rubber bands and will execute three movements with only one motor.
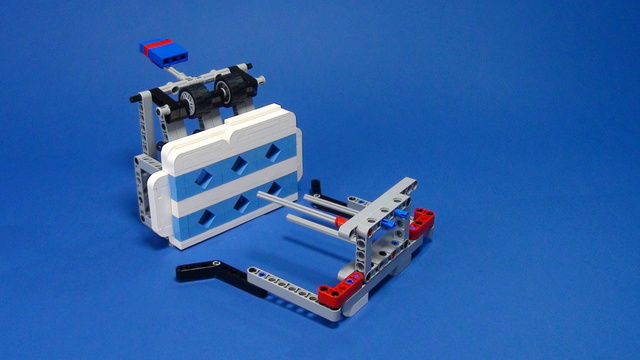
Ambulance and Truck Robot Lifting Attachment
Attachment part of a series of robot attachments for accomplishing the FIRST LEGO League 2013 competition. This specific construction lifts the two vehicles. It uses rubber bands for locking the levers. Take a look at the video tutorials for details explanation on how it works.
Build from LEGO Mindstorms EV3 parts.

![]()
English
- Today we are again using a rubber band attachment with gear wheels that will solve the 2013 competition models. This for the ambulance and the truck. They are quite interesting because you have to move both the truck and the ambulance to another place, to another region on the mat. And, that's a difficult challenge.
Again as a reminder, these mission models are from the 2013 competition "Nature's Fury". We have the truck. The truck has some cargo. And we have to bring the truck in the yellow region on the field. And we have the ambulance. Again it's connected with "Nature's Fury" and we have to bring the ambulance to the yellow region. Check out the links below, and we will give you a link to the rules of the competition. Now, as you can see, these mission models are quite similar, and on the field they are positioned something like...the truck was here and the ambulance was like 30,40, 50cm from the truck. And now the challenge is how do you build and attachment that would somehow take the truck, and move the truck to the yellow region. It is difficult to just push the truck. For example if you just pushed the truck on this side...like this... You can see that it's not very stable because there is some friction between the tires and the field. And it will be quite difficult to also push it from behind because it is difficult to position the model like this. We've come up with an attachment that uses a rubber band and gear wheels to solve these missions. This here is the attachment . Let me just show you how it works. For the truck, this is the attachment and we place the attachment on the robot. We load the attachment, and as you can see, there is a rubber band. Let me just close it again so that you can see. There is a rubber band connecting these two gear wheels. Now this rubber band exerts some pressure, and it tries to move the gear wheels...to rotate them. So that we have these levers here that will come together when the gear wheels rotate. Now we program the robot. We attach this whole attachment to the robot. I will show you how. And when we come near the truck, there is a lever right here.and when we press the lever it releases the rubber band. And we can actually take the truck like this. We move on the field. And now, we've taken the truck. The only thing is, of course, we have to move it, but at least we catch the truck. Let's have a closer look at the attachment. We have two axles...one here and one here. And to these axles we have the gear wheels. And to these gear wheels, we have two pins. And when we rotate, we load, you can see that there is some pressure from the...there's some force from the rubber band. When we load, we actually fix the gear wheels with these pins, and there is a very interesting lever mechanism...let me just rotate it so that you can see it. It's right here. Now, how to assemble it. Of course, as you can see here, when we push, we release the gear wheels. Let's see what the construction of this lever. I'll remove the rubber band, I will also remove one of the gear wheels. I hope that you can now see it more clearly. We have the lever, and it looks like this. When we load the attachment, we move this beam here...the gear wheel....this one here. And then when we push on this lever, we actually move the beam backwards. Like this. Again, it's a very small movement...like 1 or 2mm, but it's exactly what we need. Find the complete instructions for this attachment below the video. And in the next video, we will continue with how do we add the robot and how to transfer some power to this attachment.
Courses and lessons with this Tutorial
This Tutorial is used in the following courses and lessons
FIRST LEGO League Competition. Attachments
This course is a collection of materials for many of the attachments that we've built at FLLCasts before introducing courses. The videos were built as separate different attachments for different competitions and with the following course, we try to give it a structure.
- 60
- 347:26
- 0

Attachments with Rubber Bands
Let's try to integrate more of the things we have learned into a single attachment. One that could accumulate energy, conserve it and use it at the appropriate time. All this because of a Rubber Band and a Flywheel - and if you don't know what a flywheel is you should definitely watch this videos
- 12
- 0
- 0
- 3d_rotation 9

FIRST LEGO League (FLL) 2013 Nature's fury. Review of solutions with explanations
These are a couple of structured examples and tutorials of how the missions for FIRST LEGO League (FLL) 2013 Nature's Fury competition could be accomplished. We've gathered recordings and explanations from which students and teacher can learn a lot. There are rubber bands, lifting attachments and a lot of trucks that we are pulling and pushing at this robotics competition.
- 10
- 79:11
- 0

Truck and ambulance mission
With this series of videos we are looking at FIRST LEGO League 2013 Nature's Fury competition and we are building a robot for accomplishing some of the mission. It would be a tutorial with at least four parts and we are building a complex attachment that could catch, lift and release different parts with only one motor and rubber bands. Not one, not two, but three movements with only one motor.
- 4
- 0
- 0
- 3d_rotation 4