If you think that the quick pinless attachments shown in video 63 are quick enough, see this tutorial and you will find out that the quick pinless attachments could be even quicker. These attachments can work without motors but by using the inertia forces.
- #64
- 07 Dec 2014
- 8:11
This tutorial shows the logic of creating quick pinless attachments which do not have any moving parts. This facilitates their placement and is the key to the quicker change of attachments on the LEGO Mindstorms robot construction.
There is a short description of how the attachments work; how the inertia forces affect the robot parts and what causes these inertia forces. The tutorial once again focuses on the building process of the quick pinless construction base, the attachment and the adaptor.
Try to use this type of quick pinless attachments and see how many new opportunities it will give you. Share with us your comments and ideas.
Second quick pinless attachment
Another example for a quick pinless attachment build with LEGO Mindstorms EV3 robots.

![]()
Quick Pinless EV3 Attachment
The attachment shows how to do build a pinless robot attachment with LEGO EV3 Mindstorms.

![]()
EV3 Second example program for a robot with a pinless attachment
The second example program for episode 64

![]()
EV3 Pinless Attachment Example program for episode 64
The first example program in the episode.
![]()
English
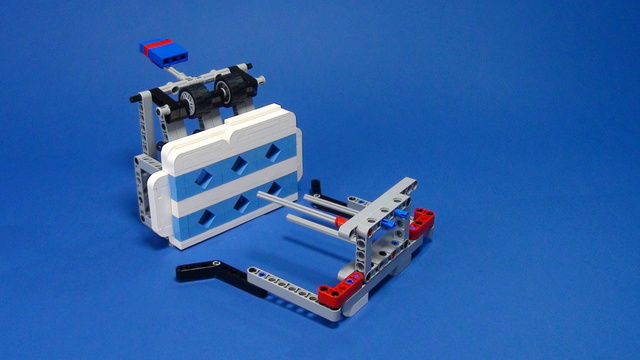
Another type of quick pinless attachment will be shown in this episode. The attachment will use inertia forces instead of motors. You are going to see why some of the robot parts stop moving and some continue when the robot stops.
On this robot you can use the sensor shield to place the quick pinless attachment base. You can make it stick to it with these parts. For example, here and here. For the construction you may need these parts.
Like that.
The same on the other side. And they need to be positioned like that.
You can connect them with that part.
And to make it a little bit durable we will place this part. Now. This is how it sticks to the robot. But it's not very stable. To make it better, you can make these connections - here and here.
Like that and that too. And here is the base.
Now it's much more durable. The attachment that is going to be created will be for the Senior Solutions Chair Challenge Solving. The attachment has to catch the chair in that way and bring it to the base.
For that purpose you may use two fifteen pin hole beams and one thirteen pin hole beam. You may connect them with that element. Like this and here it is.
And this is the attachment. But in that way it is not very safe. The chair may fall off the attachment. Thus, you may construct the same construction.
And connect both elements in that way. You may use this kind of element.
You may leave the last holes for the adaptor between the attachment and the base.
Like that and here. And it's ready. But as you see it isn't stable. To make it a little bit more stable, you may use this element. And now it's much more stable. Up to now, you have the quick pinless attachment base and the attachment. You need to construct the adaptor. For the adaptor you may use these small axles here with that element.
Like that.
After that, you may use this small axle - again like that. And this part - like that.
And one three-unit axle with a cap.
And you have to do the same on the other side.
Like that.
And here it is. That axle here.
And the other one here.
And the cap.
Now everything is ready. But as you can see, it's very difficult for the attachment to fall in that way. You have to speed up the robot a lot. So, you may use this part.
You may attach it here.
So, you can use it to make this construction vertical. Now let's see how it works.
Now - this is what happened. While the robot is moving, all parts are moving with it. The robot stops and the inertia forces come into play. The inertia drives the parts to continue moving forward. The parts that are rigidly connected to the robot also stop. But the upper part of the frame isn't rigidly connected, so it falls. Now you are going to see an example of how quickly we change the attachment. Try to use the same principle in your robots and leave us a comment below. Thank you.
Courses and lessons with this Tutorial
This Tutorial is used in the following courses and lessons
FIRST LEGO League Competition. Attachments
This course is a collection of materials for many of the attachments that we've built at FLLCasts before introducing courses. The videos were built as separate different attachments for different competitions and with the following course, we try to give it a structure.
- 60
- 347:26
- 0

Attachments
You think that you can quickly change the attachments of your LEGO Mindstorms EV3 competition robot? Are you sure? In this first episode of the series you will see how to create and attach attachments without using pins and how faster and easier this could be. You will see the design logic of a few attachments and how they work on the field.
- 5
- 0
- 0
- 3d_rotation 6

FIRST LEGO League with LEGO Education SPIKE Prime. "Challenge" competition for 9-16 years old
This is the most detailed course we've ever created on preparing for a FIRST LEGO League robotics competition. It focuses on using LEGO Education SPIKE Prime to build a simple Box Robot. The course includes 25 lessons, making it suitable for both beginners and advanced students. It builds on over 10 years of experience providing example solutions and explanations for FIRST LEGO League robotics competitions.
This course is one of the popular courses in the FIRST LEGO League Robot Game. The Complete Guide. We highly recommend checking out the full guide!
- 40
- 127:22
- 24

Quick Pinless attachments on a robot
This tutorial shows how quick pinless attachment collects loops. Such attachments are popular at the FIRST LEGO League competition. The attachment uses Luly, a small LEGO Education SPIKE Prime competition robot with 3D building instructions as a robot base.
- 3
- 0
- 1
- 3d_rotation 3
FIRST LEGO League with LEGO Education SPIKE Prime. "Challenge" competition for 9-16 years old
This is the most detailed course we've ever created on preparing for a FIRST LEGO League robotics competition. It focuses on using LEGO Education SPIKE Prime to build a simple Box Robot. The course includes 25 lessons, making it suitable for both beginners and advanced students. It builds on over 10 years of experience providing example solutions and explanations for FIRST LEGO League robotics competitions.
This course is one of the popular courses in the FIRST LEGO League Robot Game. The Complete Guide. We highly recommend checking out the full guide!
- 40
- 127:22
- 24

Inertia triggered attachment for collect
Inertia triggered attachments does no require the use of a motor. Let the inertia do all the work. These kinds of attachments are very useful at robotics competitions like FIRST LEGO League and World Robot Olympiad. The robot moves, the attachment falls and grabs the ball. The attachment uses Luly, a small LEGO Education SPIKE Prime competition robot with 3D building instructions as a robot base.
- 2
- 0
- 1
- 3d_rotation 2

FIRST LEGO League with LEGO Mindstorms Robot Inventor. "Challenge" competition for 9-16 years old
The goal of this course is to take you through some of the most useful principles for building and using attachments to accomplish missions at FIRST LEGO League competitions. The whole course is based on a LEGO MINDSTORMS Robot Inventor and you need a single 51515 set and without additional parts (you will need a second color sensor for the lessons for using two color sensors, but feel free to skip them if you don't have it). For every mission there is a Scratch and Python program attachment. The course consists of 25 lessons suitable for beginner and advanced students. Every lessons consists of a video tutorial demonstrating the principle and how the mission could be accomplished along with building instructions for the robot, the attachment and programs for controlling the robot.
- 43
- 131:34
- 21

Quick Pin less attachments on a robot
With this animation we demonstrate an example for a quick pinless attachment that could be used to collect loops. Loops is one of the most common missions at FIRST LEGO League competitions. We use the LEGO Mindstorms Robot Inventor set to build the attachment, the mission model and the robot. They are all from the same attachment. In the live video in the same lesson we enter into more details about the attachment and we describe its idea
- 4
- 0
- 0
- 3d_rotation 3