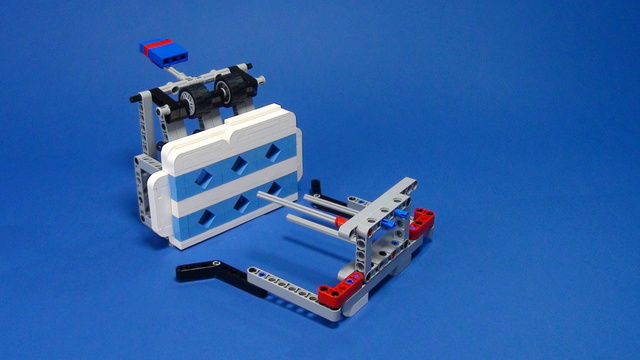
You think that you can quickly change the attachments of your LEGO Mindstorms EV3 competition robot? Are you sure? In this first episode of the series you will see how to create and attach attachments without using pins and how faster and easier this could be. You will see the design logic of a few attachments and how they work on the field.
- #63
- 30 Nov 2014
- 8:43
Construction
The first part shows a construction similar to the one shown in Episode 60. The construction presents the logic of how to make a quick pinless attachment. The robot from Episode 58 has been used for the current presentation.
Attachment base
The second part of the video shows how to make a base for various pinless attachments. Usually, there are two bases designed for one robot. While the robot is using one of the bases on the field, the other remains with the team who attach the construction necessary for the following missions. When the robot returns to the base, the quick pinless attachment base is removed and the other one is attached and vice versa.
Adapter
The third part of the video shows how to build an adapter. This is a construction connecting the base to the attachment. One adapter could be used for several attachments. It is also possible to have an adapter for each attachment.
The purpose of the base, the adapter and the quick pinless attachment is to save parts which could be used for the making of whole attachments.
The last part of the video shows how the robot behaves on the field.
We are looking forward to your comments. We would be happy if you share how this video has been useful to you.
Instruction for building the Quick Attachment
Instructions for building the quick attachments for this LEGO robot
Pinless attachment FIRST LEGO League 2012 missions example program
The example program used at the end for solving the FIRST LEGO League 2012 missions
English
In this cast I will talk about quick attachments. How to make and use them; what their benefits and issues are. For example, this is a normal pin attachment. It's easily mounted but when you have to remove it, the pins are the bad guys - you have to remove them by hand and this is a time-taking process. The quick attachment is easily mounted; it has enough strength and it's easy to remove. In this cast some complex constructions will be discussed and the way to design them.
As a specific example, the senior sollution flag challenge will be coped with.
This robot will be used to demonstrate the attachment. This is the attachment. It's very similar to the one from cast 60.
This is the way it works.
OK. Now, when you have the attachment and the robot, all you have to do is find a way to make a rigid connection between them. When you know your construction and the construction of the robot, you have to find a way to make the construction rigid in the easiest way. Probably, one of the easiest ways for that robot is to use that channel here.
These three parts can be used.
This is the first one, this is the second one and this is the third one.
This is a very simple lock. All you have to do after you put the attachment is to lock it. Now it's very durable
and very easy to remove. Probably, you are going to need a lot of attachments during the competition. This means a lot of parts. if you don't have a lot of parts, you may use a quick pinless attachment base. It's a carrier for normal attachments. So, while the robot is on the field with the first base and the attachment to it, the second one is with you where you can remove the previous attachment and put the attachment you are going to need. So, when the robot is back to the base, you can quickly change the attachments. And so on, until the end of the race. The quick pinless attachment base design logic is pretty simple. The first thing to do is decide where to place the attachment base. For that robot, these beams and the sensor shield will be used. The second thing to do is decide what kind of element you will use for a base of the attachment. For example, this beam will be used for this robot. It has to be placed like this. To do that, you may use some angled beams. Like these.
Here it is.
And you are ready. In that way, however, the base may easily fall. So, to prevent this, you have to make a grabber to lock the attachment to the robot. In this case, the same angled beams could be used. Like that.
So, you can easily attach it to the robot. And detach it. If you're in a hurry, you may use force to detach it.
Up to now, you have the attachment and the base.
What you need now is an adaptor to make the connection between the attachment and the base. To make this adaptor, you need to decide how to attach the connection to the base. In this case, this hole here will be used. Like this.
And a beam will be used here.
Like this. This beam is going to be placed here.
OK.
This is going to be the adaptor. For connecting these two beams you may use this type of element.
Like this.
And like this. But, as you can see, it's not very stable. Not at all. So, to make it stable, you may detach the attachment
and use this kind of beam
to make it more stable.
Now you have a fully equipped quick attachment which could be used on the robot. It's very durable
and you may unlock it by using force. So, now, you have the attachment,
you have the adaptor
and the base. The attachment will be demonstrated on the field now.
And this is it. Another type of quick pinless attachments will be shown in some of the next videos. We'd like to see your constructions of quick pinless attachments and we are looking forward to your comments and suggestions below. Thank you.
Courses and lessons with this Tutorial
This Tutorial is used in the following courses and lessons

FIRST LEGO League Competition. Attachments
This course is a collection of materials for many of the attachments that we've built at FLLCasts before introducing courses. The videos were built as separate different attachments for different competitions and with the following course, we try to give it a structure.
- 60
- 347:26
- 0

Attachments
You think that you can quickly change the attachments of your LEGO Mindstorms EV3 competition robot? Are you sure? In this first episode of the series you will see how to create and attach attachments without using pins and how faster and easier this could be. You will see the design logic of a few attachments and how they work on the field.
- 5
- 0
- 0
- 3d_rotation 6

FIRST LEGO League with LEGO Education SPIKE Prime. "Challenge" competition for 9-16 years old
This is the most detailed course we've ever built on how to prepare for a FIRST LEGO League robotics competition and we've specifically focused on the use of LEGO Education SPIKE Prime as a simple Box Robot. The course consists of 25 lessons suitable for both beginner and advanced students. We build on the knowledge of 10 years of sharing example solutions with explanations for FIRST LEGO League robotics competitions.
This course is one of the popular courses in the FIRST LEGO League Robot Game. The Complete Guide. We recommend you also check out the whole guide.
- 40
- 127:22
- 24

Quick Pinless attachments on a robot
This tutorial shows how quick pinless attachment collects loops. Such attachments are popular at the FIRST LEGO League competition. The attachment uses Luly, a small LEGO Education SPIKE Prime competition robot with 3D building instructions as a robot base.
- 3
- 0
- 1
- 3d_rotation 3

FIRST LEGO League with LEGO Mindstorms Robot Inventor. "Challenge" competition for 9-16 years old
The goal of this course is to take you through some of the most useful principles for building and using attachments to accomplish missions at FIRST LEGO League competitions. The whole course is based on a LEGO MINDSTORMS Robot Inventor and you need a single 51515 set and without additional parts (you will need a second color sensor for the lessons for using two color sensors, but feel free to skip them if you don't have it). For every mission there is a Scratch and Python program attachment. The course consists of 25 lessons suitable for beginner and advanced students. Every lessons consists of a video tutorial demonstrating the principle and how the mission could be accomplished along with building instructions for the robot, the attachment and programs for controlling the robot.
- 43
- 131:34
- 21

Quick Pin less attachments on a robot
With this animation we demonstrate an example for a quick pinless attachment that could be used to collect loops. Loops is one of the most common missions at FIRST LEGO League competitions. We use the LEGO Mindstorms Robot Inventor set to build the attachment, the mission model and the robot. They are all from the same attachment. In the live video in the same lesson we enter into more details about the attachment and we describe its idea
- 4
- 0
- 0
- 3d_rotation 3

