Let's try to integrate more of the things we have learned into a single attachment. One that could accumulate energy, conserve it and use it at the appropriate time. All this because of a Rubber Band and a Flywheel - and if you don't know what a flywheel is you should definitely watch this videos
- #104
- 06 Sep 2015
- 10:04
- LEGO MINDSTORMS, LEGO MINDSTORMS EV3
- FIRST LEGO League, FIRST LEGO League 2014-2015 World Class, Attachments, Flywheel, Rubber band, FLL 2014, EV3, FLL, Construction
The FIRST LEGO League 2014, World Class competition has a mission called Search Engine. It is the standard loop collection mission and we have done many videos on this. But the mission challenge has a random element. You should return to base a specific loop with specific color and the color is drawn by rotation a system of gears.

What we are doing in the video is to introduce Flywheels without going into the physics of a Flywheel. Just the observed behaviour. The flywheel allows us to solve the mission without a color sensor and without depending on the random element of the challenge. Which is just magnificent.
Interesting information
Flywheels are part of the design of a new robot that would be used to land on Asteroids and Coments and generaly objects with less gravity - This "Hedgehog" Robot Could Hop And Tumble Over Asteroids And Comets
Flywheels could be used in various
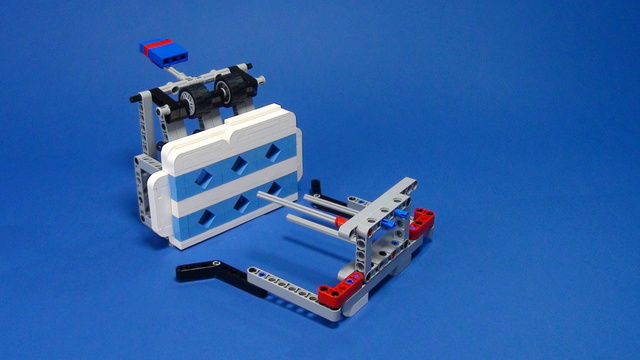
The attachment
The attachment is again a pinless attachment and could be added to almost any robot construction in a very fast and precise way. For more on pinless attachments check out these videos:
Pinless Flywheel and Rubber band attachement for LEGO Mindstorms robots
Kiril Mitov's most favourite attachment. To quote him "I had a really great fun building this attachment and recording the videos for it".
It's an attachment with a Rubber band and a Flywheel and a Gear Wheel and a Worm Gear. So much knowledge in just one small attachment. The goal of the attachment is to be able to have an active attachment without actually having a motor. So you can place that attachment and it will do the work for you instead of using a motor to power it.
Build with LEGO Mindstorms EV3 set.
When placing the rubber bands check out the tutorials
Placing the white rubber band is shown at https://www.fllcasts.com/tutorials/105-rubber-band-attachment-with-a-flywheel-solving-fll-2014-search-engine-part-2 at around 05:40.
Placing the red rubber band is shown at https://www.fllcasts.com/tutorials/104-rubber-band-attachment-with-a-flywheel-solving-fll-2014-search-engine-part-1

![]()
English
- In today's video, we continue using rubber band attachment to solve mission challenges and we're working on 2015 World Class Challenge. It was a very interesting mission where you have to push the element here. And depending on the color that you get, you must take the corresponding loop. Now that's a very interesting mission, and it is basically solved with a color sensor or light sensor. But today, we are solving it without any sensors and only with the use of attachments with rubber bands. The mission was quite challenging because there is a random element here. When you push the attachment, it is always a different color. And depending on the color, you get the different loops. The challenge is-, and there was a-, one thing for the mission that this whole model must turn at least 360°; so, it must make a full circle. So you can't just push it, very, very lightly, and get blue. You must push it at least to 360°, like this. We're going to try to solve this mission by pushing it at exactly 360°. So at the start, you have blue here. And then we push it exactly toward 300°. No, so it was red. We have red here in the bottom. And then we push it exactly at 360°, and we get red. And then we know at the start of the competition, what is the loop that we have to take. It does not depend on what color we draw, because we know that we are going to draw red.In the challenge this is where the rubber band attachment comes in. Now, as for the attachment, it is quite complex but very interesting. It has a number of interesting elements. But first, let me demonstrate it, only the attachment. We have an axle. And whenever we push the axle, we get this element here that is pushing the mission model. Then, we lower it again and push the axle. As you can see, there are no motors here, it has only one or two rubber bands, and this is actually the attachment. Now, when you're at the competition, we have the border, and this mission model was placed something like this, very close to the-, at the border. Something like this. The idea is that we program the robot. The robot moves, it reaches the border. And then by pushing the robot to the border, we actually push this axle here. So, it goes something like this. Let me just load it. Now it's loaded. And if I move to the border, let me just find the right angle, so that you can see it on the camera. When I push, we have this part here pushing the whole mission model. Again, I load. Program the robot, it moves on the field, then reach the border. We push to the border, and the attachment is activated. Again, it is a pinless attachment, so we can just place the robot on top of the attachment very easily. That's it. And now, we can program the robot. We have the mission element here. And let's say that, we have it red. So red is color, which is currently selected, and we would like to turn the attachment at exactly 360°. We load the attachment. We move. We reach to the mission element. And we slightly push now, it would be difficult now because I have to hold the elements because they are not attached to the table. But when I push it, we can see that the attachment turns at 360°. And we have the red again as the selected color. Now let's go into more details on how the attachment works. Now, I've zoomed in so that you can see the attachment clearly and closely. So first, we have this attachment, a pinless attachment. So we have our pinless mechanism here, and we can put the robot over the attachment like this, done. No pins involved. That's the first interesting thing for the attachment. The second is the triggering to the attachment. The triggering is done with this axle here, and we have our rubber band. And this rubber band has a worm gear attached to it. So, actually, the worm gear is attached with the rubber band through the axle. And as you can see, you can see we have this gear wheel right here, and the worm gear attached to the gear wheel. And this worm gear is not letting the gear wheel rotate. And when we push on the axle, we release the gear wheel and will start rotating. Again, I'll load the attachment. The worm gear is stopping the other gear wheel from rotating. And now when I push the axle, we're releasing the attachment and the gear wheel rotates. So, that's the second interesting part from this element. Third, because we are pushing, and we are pushing to the border, and pushing always involves some kind of force. What happens is that when we push, the whole attachment bends, like this [[indiscernible 00:07:26]]. So, when we place the attachment, we load the robot. We add this element here that are stopping the attachment from bending. When we are pushing, it's not bending. So it's-, we don't have this movement here. And finally, we have this large wheel over here, and I'll get in more details about this in a second. We can get more details about the attachment, we have this large wheel attached to the axle. And this is actually a flywheel, this is where the physics come to work. And so, there's a lot of physics involved in flywheels, but I'm not gonna stop on this currently, I'll just demonstrate it. And in the description below, I'll give you more links about other resources that were built about flywheels. But as you can see now, if I release the attachment, we have a very slow movement like this. If I load it again now, and remove the wheel, this latch will work here. And if I now release the attachment and I pushed the axle, what will happen is that this part here, it will move very, very fast, like this. So the slow movement is actually because of the flywheel, well, not only. We also have the gears that have some ratio and they exert power. But in connection with the flywheel, we make the physics work. But again, we will stop on the physics in some of the next videos. Now, let me stop here, because we are over 10 minutes now, and so, about 10 minutes. And in the next video, we'll enter into the attachment, we will deconstruct it and I'll show you the exact way that it works. There is a rubber band inside that makes this movement. And with the flywheel, we will see this slow movement of the attachment, like this. It's very interesting. Check out the next video.
Courses and lessons with this Tutorial
This Tutorial is used in the following courses and lessons
FIRST LEGO League Competition. Attachments
This course is a collection of materials for many of the attachments that we've built at FLLCasts before introducing courses. The videos were built as separate different attachments for different competitions and with the following course, we try to give it a structure.
- 60
- 347:26
- 0

Attachments with Rubber Bands
Let's try to integrate more of the things we have learned into a single attachment. One that could accumulate energy, conserve it and use it at the appropriate time. All this because of a Rubber Band and a Flywheel - and if you don't know what a flywheel is you should definitely watch this videos
- 12
- 0
- 0
- 3d_rotation 9
FIRST LEGO League Competition. Attachments
This course is a collection of materials for many of the attachments that we've built at FLLCasts before introducing courses. The videos were built as separate different attachments for different competitions and with the following course, we try to give it a structure.
- 60
- 347:26
- 0
FIRST LEGO League 2014 World Class. Example solutions
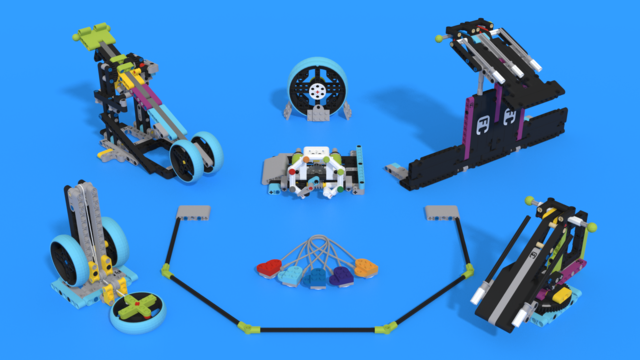
In this video tutorial we experiment with different ways of solving the sports mission for throwing the ball. We show seven different LEGO MIndstorms EV3 and NXT robot constructions and attachements. Most of the techniques could be applied for any mission involving throwing a ball or an object.
- 16
- 0
- 0
- 3d_rotation 7

FIRST LEGO League (FLL) 2014 World Class. Review of solutions with explanations
These are a couple of structured examples and tutorials of how the missions for FIRST LEGO League 2014 Word class competition could be accomplished. We've gathered recordings and explanations from which students and teacher can learn a lot. There are missions and attachment for rubber bands, lifting with rubber bands, throwing and other interesting and challenging robotics missions from the competition.
- 16
- 85:15
- 0

Rubber band attachment with a flywheel
Let's try to integrate more of the things we have learned into a single attachment. One that could accumulate energy, conserve it and use it at the appropriate time. All this because of a Rubber Band and a Flywheel - and if you don't know what a flywheel is you should definitely watch this videos
- 5
- 0
- 0
- 3d_rotation 1
FIRST LEGO League 2020-2021 RePlay Solutions and review with SPIKE Prime
This course presents Solutions and Review of the FIRST LEGO League 2020-2021 RePlay competition. We do such a course every year after the competition. By moving through the course lessons, building the robot and attachment and completing the missions you will learn how to achieve FLL mission following good engineering principles for building robots, attachments and developing programs. Upon completion of the course you will have many new ideas about how to approach mission on every FLL robotics competition and how to help your team score more points.
- 74
- 158:11
- 15

M02. Step Counter
In this FIRST LEGO League video tutorial we accomplish the Step Counter mission from the FLL 2020 RePlay mission. The mission model is quite interesting as it can not be pushed fast and it can not be pushed slowly, because it will jam. The robot must push it with the right speed and this proves to be difficult.
- 7
- 0
- 1
- 3d_rotation 3