Когато строите по инструкции, има някои често допускани грешки.
Когато строите по инструкции, има някои често допускани грешки.
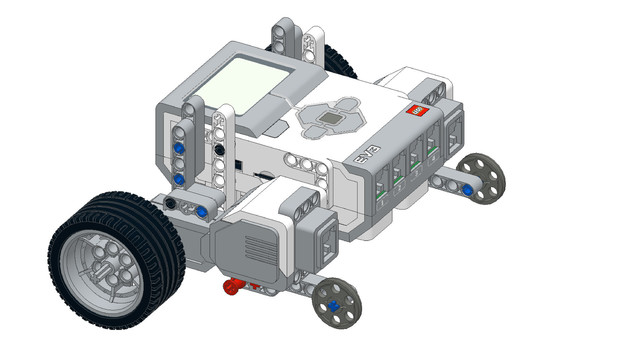
Внимавайте как е разположен брика и в коя посока се намира дисплеят му.
Важно е дисплеят да гледа към вас, понеже от него стартирате програмите. Има значение от коя страна са портовете на робота, за да подберете оптимална дължина на кабелите и оптимална позиция на кабелите около робота.
Може да направите грешка с
Г-образните греди и да ги поставите в завъртяна или огледална позиция.
Щифтовете също може да се поставят отляво или отдясно на греда и това има голямо значение.
Измервайте дължините на гредите и осите. Има значение дали ос е сецмица или петица.
Бройте внимателно в кой по ред отвор отива всеки щифт в гредите.
Винаги проверявайте дали това, което се построили във всяка стъпка, съвпада точно с инструкциите на екрана.
When you build the robot or basically every robot that we show you you follow a number of instructions. You follow a PDF document or other documents and you follow instructions. While following these instructions there are a couple of things that you should be careful about and in this video I'll stop at some of them.
First, every robot has this brick. And when you are using the brick it kind of looks symmetrical but you should be careful how you place the brick because in this way you would arrive at a different solution. And it's different if you have this robot looks like this with the display of the brick pointing forward and it will be a different robot if the display is placed like this. So you should always be careful of the direction of the brick. Next, in the set and in most of the robots you generally use beams that have angles. And you must be careful of the direction in which you put these beams. So you should follow strictly the instructions. And it's very different if you place the beam like this or if you place the beam like this.
In this way you will arrive at completely different robots and I'm mentioning this because we've seen a lot of students trying to follow the instructions and sometimes they just place the beam in the reverse way. So, be careful how you place your beams and follow the instructions correctly. It seems very very easy but it's not. When you have the beam and it's some kind of an angle beam you can see that it has a number of holes and in the PDF instructions you see this small pin and an instruction to put this small pin in one of the holes. And a common mistake is to just put the pin in another hole. And from this your construction will be wrong. You won't be able to follow the instructions correctly. So it's very important when you place your pin to place the pin in the correct hole. The second, the third, the fourth. You must count this from the PDF document. Also when you then place the beam with the part on the robot you must be very careful how you place it on the brick. Like this, on this side of the brick like this, on this side of the brick or like this or like this. There are so many different configurations that you can think of. You must follow the instructions correctly. In the robot most of the time you'll have these axles. And there are grey and black axles in the EV3 set. And there is a difference between these axles. When following the PDF instructions for building the robot next to the axle that is shown you'll see a small number. And this number is the length of the axle. An this number is like 4, 5, 6, 7, 8. And it's interesting to mention what this length is. And if you take a beam like this and you can see that is has a number of holes. So actually the length of the axle is measured in the length of the holes that it takes on the beam. And this axle is with length 7. 1, 2, 3, 4, 5, 6, 7. And this axle is with a length of 5 holes. Like this. So, be careful to use the axles with the correct length.
Този Урок е използван в следните курсове и занятия.
The things that you will be able to do with your EV3 robot by the end of this course are:
Freely move your robot towards desired target;
Avoid obstacles on the path of your robot using sensors;
Follow lines of any shape;
Detecting and picking up objects of any kind;

Първото ниво от учебната програма по LEGO роботика за ученици от пети до дванадесети клас.
В нивото се изграждат различни конструкции на роботи. Управляват се моторите така, че роботите да извършват прецизни завои около „земята“ и „луната“. Преодоляваме различни препятствия след като се блъснем в тях благодарение на сензора за допир.
С помощта на сензора за разстояние роботът се движи без да се блъска в заобикалящите го препятствия. Достигаме до понятията цикъл, градуси, среден мотор. Накрая роботите могат да изпълняват едновременно две различни неща - докато изпълняват мисии върху специално изградено поле, третият двигател разчиства засечени обекти.

Днес ще се запознаете със съучениците и преподавателя си, ще се научите как протичат занятията ни, ще конструирате първия си робот и ще се научите как да програмирате робот да се движи. Целта на занятието е да накарате робота да се движи като Йо-Йо. Как се движи едно Йо-Йо?

Ако някога сте притежавали Йо-Йо знаете, че то е предназначено да се спуска и изкачва обратно до ръката ви. Но за да се справи успешно, трябва да движим ръката си така, че да му предадем необходимата скорост. В противен случай, той малко по малко намаля разстоянието, което се връща и накрая спира.
Опитайте се да оставите добри впечатления на съучениците си, защото това са хората, с които ще учите до края на курса.
Това ниво цели да въведе учениците ни в света на LEGO роботиката, използвайки игри. В занятията използваме предизвикателства и мисии с цел учениците да искат да ги преминат. Така те усвояват знанията, защото са им нужни за да съживят роботите си.
Част от игрите включени в курса са футбол, боулинг и изстрелване на хартиен самолет. Нивото работи с ученици от 8 до 12 години и дори по-големи, които също ще се забавляват с игрите с роботи.

Подходът ни в този и в следващите курсове ще е следният: поставяме една голяма задача, която задава посоката на занятието, и работим само по нея.
Първото ниво от учебната програма по LEGO роботика за ученици от втори, трети и четвърти клас.
Едно, “пътешествие из космоса”, но с роботи. В нивото се изграждат различни конструкции на роботи. Управляват се моторите така, че роботите да извършват прецизни движения около „земята“, „луната“ и „слънцето”. Преодоляваме различни препятствия след като се блъснем в тях благодарение на сензора за допир. Изграждаме и програмираме роботи, които могат да се сражават и защитават стига това да се наложи.
Освен, че кутиите и работните места трябва да са в примерен вид, е важно да ангажирате вниманието на учениците преди началото на занятието.
Всеки решил да се развива в сферата на роботиката, се е насочил към нея защото е бил омаян от възможността да се автоматизира ежедневието. Дали имате желанието да направите много малки роботи, които работят заедно за да улеснят живота ви или един голям човекоподобен робот, който пише домашните ви вместо вас, вие също сте дошли за да създадете свои роботи. За да създадем сложни роботи, трябва първо да създадем простички роботи, но това не означава, че те не могат да бъдат функционални. "Paaila Technology" е една от фирмите започнали да произвежда и продава роботи, които са програмирани да бъдат сервитьори и ние днес ще си създадем простичък робот, който сервира. За повечето от вас, това са първите крачки в роботиката и затова ще започнем от простичък робот с поднос, който се придвижва до определено място и се връща след това. Във всяко следващо занятие ще се учим как да правим все по-сложни роботи и ще можете да автоматизирате все повече от живота си.


Първото ниво от учебната програма по LEGO роботика за ученици от втори, трети и четвърти клас.
Едно, “пътешествие из космоса”, но с роботи. В нивото се изграждат различни конструкции на роботи. Управляват се моторите така, че роботите да извършват прецизни движения около „земята“, „луната“ и „слънцето”. Преодоляваме различни препятствия след като се блъснем в тях благодарение на сензора за сила. Научаваме любопитни факти за Слънчевата система и за космическите апарати.
